...
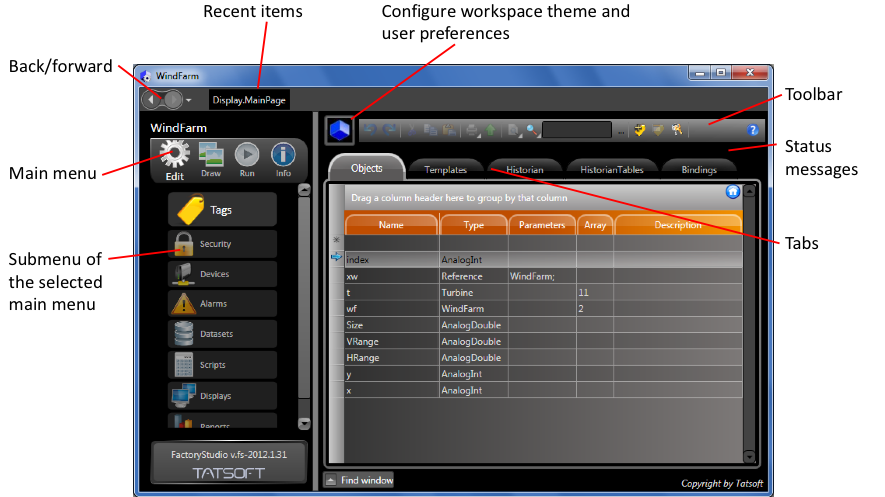
The Engineering Workspace
...
is a comprehensive display application that provides the tools and information you need to manage every aspect of FactoryStudio.
...
- Workspace Overview introduces the workspace and explains how to work with it.
- Navigating in the Workspace describes the various user interface screens available in the workspace and their organization.
- Working with DataGrid Tables discusses the organization and use of the tables, called datagrids, that are presented on many of the user interface screens.
- Productivity Tools explains the major tools and features that are included in FactoryStudio to assist with common tasks. These include Intellisense, refactoring, and cross reference.
- Dictionaries describes three different types of dictionaries that you can create: localization dictionaries for language translation, enumeration sets to display integer values as strings, and dictionaries to define object categories.
- Preferences allows you to set project-wide preferences for your project.
...
At the toolbar, you can click at the Blue Cube to configure your workspace themes:
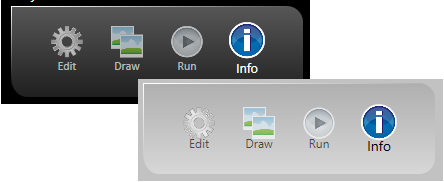 Image Added
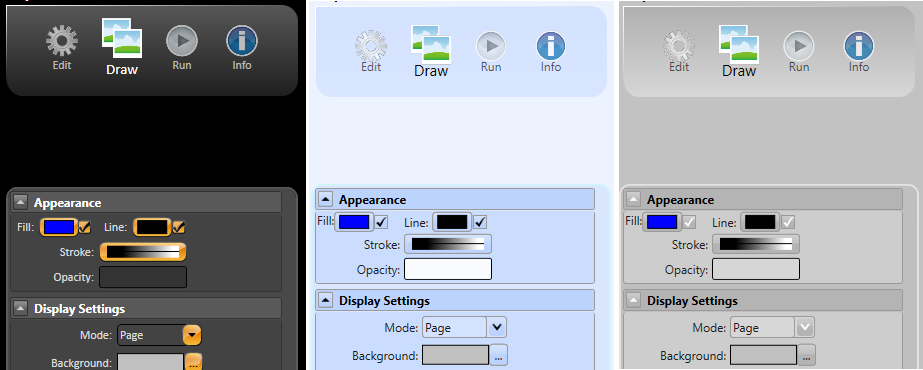 Image Added
| In this section... |
|---|
| Page Tree |
|---|
| root | Engineering Workspace |
|---|
|
|
...
...
Environments
At the highest level, there are four environments: Edit, Draw, Run, and Info.
 Image Modified
To configure the basic elements of your project, from the Main Menu, click on the "Edit" icon. This displays an index of all the main sections
...
...
Tags, Security, Devices, Alarms, Datasets, Scripts, Displays and Reports:
 Image Added
The "Draw" icon allows you to configure dynamic displays. Select the Display on Edit-Displays and click on the Draw icon to access the graphic designer.
 Image Modified
The Run environment provides access to all project execution commands.
...
 Image Modified
The "Info" icon provides access to current project information
...
...
- Editing Tables describes how to add new rows to a table or modify existing rows
- Tooltips and Validation discusses tooltips and explains how data entered in fields is validated.
- Sorting, Filtering and Grouping shows how to sort rows, how to filter desired rows and how to treat rows as a group
- Adding and Removing Columns explains how to control which columns appear in a table
- Common Column Definitions defines several columns that are common to most datagrid tables
- Copying and Pasting Rows explains how to use the smart copy/paste in FactoryStudio to copy rows between FactoryStudio datagrids and Excel spreadsheets.
...
- Click the first column of the insertion row. The insertion row is the first row of the table and has an asterisk
 next to it.
 Image Removed
After you click a column in the row, the * becomes a pencil icon, showing that you are now editing that row.
 Image Removed
- Do one of the following in the column in which you clicked:
- If the column is a text field, enter the information.
- If the column is a selection field, click again, then select items from the drop-down list or pop-up window that displays.
- Press Tab to move through the columns in the row.
To edit an existing table row:
- Click the column in the row that you want to change.
- Do one of the following in the column in which you clicked:
- If the column is a text field, enter the new information. The system overwrites the text that was in the field. To change part of the text, click again, then make changes.
- If the column is a selection field, click again, then select items from the drop-down list or pop-up window that displays.
...
- From any table, click the column heading you want to use to sort. The items now sort in ascending alphanumeric order based on that column.
 Image Removed
- Click the column heading again to sort in descending alphanumeric order.
- Click the column heading again to return to the default order.
To filter a table:
- From any table, hover over the column heading you want to use to filter.
- An arrow for a drop-down list displays next to the column heading.
 Image Removed
- Click the arrow to see the list of items in the column.
 Image Removed
- Select the items you want to include in the filter.
- To remove the filter, click the drop-down list and click (Clear Filter).
To group items in a table:
- From any table, drag a column heading to the area above the columns to group by that column.
 Image Removed
- To remove the grouping, drag the column name back to the column headers area.
...
...
- From any table, right-click in the column heading area.
- A list of all available columns for that table displays. Columns with a check mark next to them currently display in the table.
- Select or deselect columns in the list.
- Click outside the list to close it.
- To change the order of the columns, drag a column heading to a new location.
- To reset the columns to the default, click
 Image Removed Reset Grid to Default Settings.
...
- Common column descriptions
...
...
Column
...
Description
...
ID
...
Database ID assigned to the object in the table. Numbers are assigned starting from 1 for the first object created and continue as needed. The IDs are unique only to a specific table.
...
Level
...
Select the level you want to associate with the tag on the Assets tab. See Creating Assets in the chapter Tags and Templates.
...
Category
...
...
DateModified
...
Date the object was last changed.
...
DateCreated
...
Date the object was created.
...
Description
...
Enter a description of the object.
...
- From any table, select one or more rows.
- Right-click and select Copy Selected Rows.
- Go to another tab in FactoryStudio.
- Right-click and select Paste Rows.
...
- From any table, select one or more rows.
- Right-click and select Copy Selected Rows.
- The copy automatically includes all available column headings for the tab you are in.
- Go to a spreadsheet and paste.
To paste rows from a spreadsheet:
- Set up the spreadsheet columns by following the copy steps above.
- Enter the information you want.
- Copy the information, including the headings, from the spreadsheet.
- From the corresponding table, right-click and select Paste Rows.
- The paste automatically places the data into the corresponding columns. Any empty cells are ignored.
...
- Create the data in a spreadsheet. If you are creating tags or other objects, you can name the objects as needed. If you are populating other columns, the data in the columns must match what FactoryStudio expects.
- Save the file as a .csv.
- From the corresponding table in FactoryStudio, click
 Image Removed Import from a CSV file.
 - Navigate to the .csv file and select it.
- Click Open.
...
...
...
...
- Intellisense provides valid suggestions when information is being entered
- Refactoring enables changing object names easily at any time.
- Cross Reference provides usage counts and complete cross reference tables for object names
...
| root | Engineering Workspace |
|---|
|
- Do one of the following:
- From the table that has an occurrence of the object you want to find, select the object. For example, select the tag you want to find elsewhere in the project. The Find field in the toolbar auto-populates with the name of the selected tag.
- In the Find field in the toolbar, enter the type of object (tag), followed by a . (period), followed by the name of the object (the tag name in this case). As you type in the field, the system matches the first entry to objects in the system. After the first period, it lists all objects of that type.
- Next to the Find field, click .... .The Select Object window displays with a list of all the object types. When you select an object type, the names of that type display.
- Click Find or, from the Select Object window, click OK.
- The results of the search display in the Find window at the bottom of the page.
- Double-click any row in the find results to go to that item.
- To close the results pane, click Find window at the bottom of the page.
...
- Go to Run > Tools > UseCount.
The table lists the number of references to every object in the system.
To view objects that are not used, click the UnusedObjects tab.
For a complete cross-reference of all objects, click the CrossReference tab.
Dictionaries
This section presents various types of dictionaries that can be created and used in FactoryStudio. These include:
- Localization dictionaries to support language translation of user interface text
- Enumeration Sets to enable selected integer values to display as strings
- A Category dictionary to define categories to be assigned to selected objects
...
- Go to Run > Dictionaries -> Localization.
- Click New.
- The Create New Localization Dictionary window displays.
- Enter a name for the dictionary.
- Click OK.
- Click Load Strings to populate the table with all controls that have strings that are set to Localizable. In the TranslatedText column, enter the text in the dictionary language.
- Create controls in a display or write a script to use the object called Client.Dictionary to configure the dictionary or dictionary options for the user. When the dictionary changes, the language changes throughout the application.
The alarm messages can also be included in the localization if the related check-box is set.
On Info-Project-Settings, you can also define the default Culture Information that the application is using. The runtime property Client.CultureInfo allows you to change it during runtime. Some display controls may get the Culture Info directly from the Operating System, so the correct procedure is to have both the Operating System setting and the project settings with the target culture to run the application.
Enumeration Sets
You can also use dictionaries to "translate" tag values to text. These dictionaries are called Enumeration Sets. For example, a device may have a value of 0  or 1
or 1  . Rather than display "0" or "1," you can display the strings "on" or "off."
To configure Enumeration sets:
- Go to Run > Dictionaries > Enumeration Sets.
- Click New.
- The Create New Dictionary window displays.
- Enter a name for the dictionary.
- Click OK.
- In the Value column, enter the numeric value, and in the Translated Text column, enter the string to display.
- For tags that use the numeric values as Enumeration Set, configure the Parameters column to use this set.
- When configuring a display component to use these tags, set the TextOutput to one of the following:
- Tagname or Tagname.Value: show the numeric value of the tag.
- Tagname.ValueAsString or Tagname.DisplayValue: show the enumeration string.
Categories
You can create a dictionary of Categories in order to allow classification of engineering objects. Most configuration tables, such as Tags, Device Nodes, or Alarm Groups, have the Category column, where you can apply one or more categories to that object.
- Go to Run > Dictionaries -> Categories.
- Edit the desired categories for this project.
The object categories can also be accessed during runtime for filtering and other custom applications, from the Category property of the objects. A list of all categories defined in the Project is available during runtime at the property Server.Categories.
Import Wizards
On Run-Extensions-Import you can find a set of wizards to import project components.
The contents displayed at that interface are dynamically created according to the DLLs found in the IMPORT folder of the project installation.
System Integrators and other partner companies can create import wizards using the Toolkits.
The built-in Import tools installed with the product are:
Import FactoryStudio Projects:
Add the components of the selected project into the current project.
Import Rockwell ControlLogix
Creates the Tag Names, Tag Templates and does the mapping of the PLC addresses, all according to the information available at the L5K file.
Import OPC server configuration
Creates the Tag Names, Tag Templates and does the mapping of the OPC Client addresses, all according to the information available by browsing to the OPC server.
Import From OSIsoft PI System
When connecting with PI System Historian Servers, this wizard automatically creates the link with the tags, elements and attributes from PI AF servers.
When connecting with PI AF, the system automatically imports the definition of all templates and asset elements in the selected database, as well as the mapping to communicate with the server.
The Import PI wizard will only show on licensed installations with the PI Connection module enabled.
Importing XML tag templates
Creates tag names and tag templates according to the data structure of the XML file. This wizard also creates the Edit-Datasets-Files configuration to read that file.
Importing .NET classes from a DLL
Creates tag templates that matches the selected .NET classes.
Preferences
.i.configuring:preferences;
.i.preferences:configuring;
You can configure the FactoryStudio theme and other preferences.
To configure preferences:
...
Setting | Description |
Theme | Select the color scheme that you prefer in the engineering environment. The theme is also useful if you open the same project twice (once to edit and once to view information). You can apply a different theme to each window to distinguish them. |
Grid Fonts | Click to see the fonts available for the user interface. Select the font family, typeface, and size, then click OK. |
Auto-save document | Select how often you want the system to automatically save changes when editing scripts, using the drawing tools, and creating reports.
|
...
Confirm on Build commands | Select to display a confirmation window every time you build the project. |
Allow duplicate Tags on | - Historian Tables—Select to permit the same tag name more than once in the historian tables. You may want duplicate tags with different rates or on different groups.
|
...
Help file location | - Local Installation Path—Select to use the help file that was installed on your computer with the FactoryStudio software.
|
...