Page Tree
Previous Releases
On Run > Extensions > Components you find all the required information to import a component into your project. Once you have an exported item from any other project, you will be able to import them into your current project.
On the top of the Components tab display, you will find some buttons:

| Term | Description |
|---|---|
| Refresh | Makes a refresh of this display, updating the grid with all the components that can be imported into the project. This list can contain any pre-created component available in your computer, defined when enabling the check box "Show components from local" with the local path, or from the Tatsoft Component Cloud (for all customers with active Software Maintenance). |
| Add Component | This button opens the "Add Component" pop-up where you can configure the properties of the component to be imported. This display allows you to select if the component will be an embedded component ("Add and merge to project"), or if it will be added as a manageable plugin ("Add as Plugin"). |
| Clear Cache | To improve performance the system creates a cache (saved list) with the latest components that were available from the Tatsoft Component Cloud the last time the list was updated. Using this button the user can clear this cache (list) to force a component list update. |
| Edit Component | This button allows you to edit a pre-created component, but it will not be possible if the option "Contents Hidden" was used to create it |

Note Item
If the component was exported using the option "Force as Plugin" then the option "Add and Merge to project" will not be selectable.
In the grid below these buttons you will find all the components that were already exported and some information about them. Right-click the column headers to select which columns you want to see.

Some of the columns you can choose from include:
| Term | Description |
|---|---|
| Name | The name of the component |
| Preview | A preview image that represents the component |
| Source | The location of the component, can be Local, or Cloud |
| Version | The version of the component (i.e.: 1.0) |
| ForcedAsPlugin | Checked (True) if the component was exported using the "Force as plugin" option |
| Product Version | The version of the product used to create the component (i.e.: fs-8.1.1) |
| Plugin Installed | A check that represents if the plugin is already installed on the project or not |
| Description | A brief description about the component |
On Run > Extensions > Installed Plugins you find information about the pre-installed plugins in the project.
On the top of the display, you will find four buttons:

| Term | Description |
|---|---|
| Refresh | Refreshes the display, updating the grid with all the items that have already been imported into the project |
| Update | Search for updates in the Plugin, based on the version number |
| Remove | Remove the plugin and its dependencies from the project |
| Import and Merge | If the plugin has not been created with the option "Force as Plugin" enabled, you can convert the plugin into a component and merge it into your project |
In the grid below these buttons you will find all components that were already exported and some information about them.

Some of the columns you can choose from include:
| Term | Description |
|---|---|
| Name | The name of the component |
| Preview | A preview image that represents the component |
| Source | The location of the component, can be Local, or Cloud |
| Version | The version of the component (i.e.: 1.0) |
| Has Update | A check that represents if there are updates available for the plugin |
Creating a new component or plugin is a very nice feature if you have different projects that require similar structures/functionalities.
The first step in this process is to create a new project that only contains the elements required to fulfill the desired purpose.
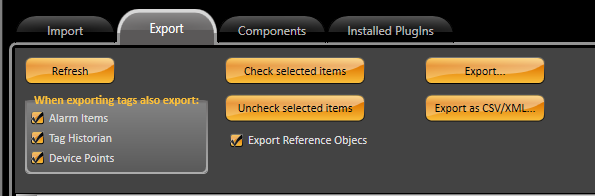
Once you have the project working, go to Run > Extensions > Export.
On the top of the display, you will find five buttons:
| Term | Description |
|---|---|
| Refresh | Refreshes the display, updating the grid with all the items that can be exported from the project. This list can contain scripts, tags, tables, devices, and any other pre-built item in your project. |
| Check Selected Items | Check all the pre-selected items on the grid. You can use both SHIFT and CTRL keys to select one or more items from this display. The checked items will be exported at the end of the process. You can manually check them by going to the column "Export" and editing it. |
| Uncheck Selected Items | Uncheck all the pre-selected items on the grid. You can use both SHIFT and CTRL keys to select one or more items from this display. The unchecked items will not be exported at the end of the process. You can manually uncheck them by going to the column "Export" and editing it. |
| Export | This button opens the "Make new component" display, where you can configure the properties of the component to be exported. |
| Export as CSV/XML | Export the components as a XML le, keeping the structure and information about the component. |
The checkbox "Export Reference Objects" means that any secondary dependency like tags, templates, and/or images will be exported as well.
The tags created on the project can be used in many different configurations on the system, like Alarms, Historian, and Devices.
The checkboxes under "When exporting tags also export:"
If you want to include these configurations always when you export a tag, you have three check boxes to do it.
Export: Under this pop-up display you have these options:

| Term | Description |
|---|---|
| Name | The name of the component to be exported |
| Force as Plugin | Force the component to be a plugin, instead of a default component |
| Contents Hidden | Makes the content of the component to be hidden, which means, that this component will not be editable in the project it is imported into |
| Preview | A preview image that represents the new component |
| Version | The version of the new component (i.e.: 1.0) |
| Description | A brief description about the component |