Page Tree
Previous Releases
| In this section... |
|---|
|
| On this page: |
|---|
Most tabs in FactoryStudio display information in a table. All tables use the same method to manipulate, copy, paste, and import data.
Editing Tables
Most configurations from the Edit menu (such as tags, alarms, and users) are stored in tables. In most tables, you can add and edit information the same way.
To add a new table item (row):
![]()
After you click a column in the row, the * becomes a pencil icon, showing that you are now editing that row. ![]()
To edit an existing table row, click the column in the row that you want to change and do one of the following:
More than one person can edit a project at the same time. The system saves all changes to the project server and propagates the changes to other users. If two users modify the same configuration table or document, the changes from the last person who saves would overwrite any previous changes.
Tooltips and Validation
Throughout FactoryStudio, fields and buttons have tooltips that contain information about the field or button. Tooltips appear when you move your cursor over the related field or button. Some tooltips include an example that can help you.
The system also validates whatever you enter into most fields, especially in tables. Validation rules may check that the input is in a correct format, that values are within the appropriate range, and other factors. The exact rules depend on the specific item. If you see a red outline around the table cell, the entry is not valid.
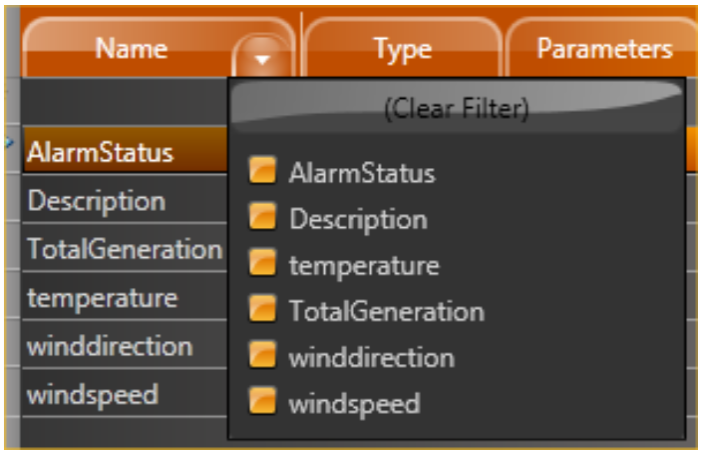
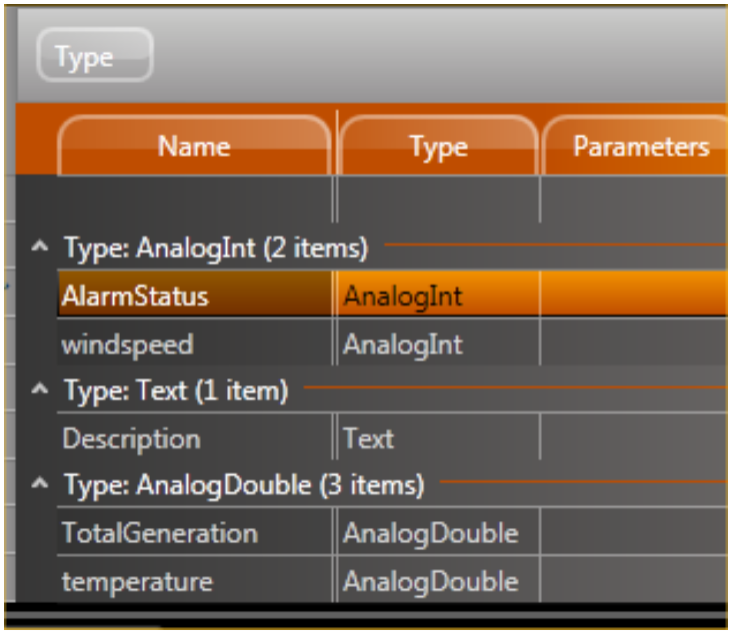
Sorting, Filtering, and Grouping
Information in many tabs is shown in tables that you can sort, filter, and group. By default, items in a table are listed in the order in which you created them.
To sort a table:

To filter a table:
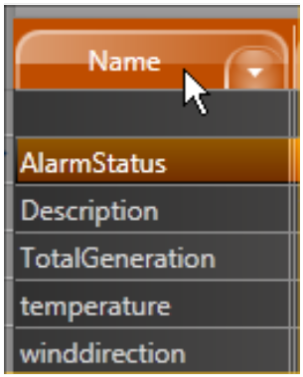
To group items in a table:
Adding and Removing Columns
Tables in FactoryStudio display a default set of columns. Every table has additional columns that you can display, and you can remove any of the default columns. You can also change the order of the columns.
To add or remove a column:
Common Column Definitions
Several common columns are available in most tables. These columns are defined below.
Column | Description |
ID | Database ID assigned to the object in the table. Numbers are assigned starting from 1 for the first object created and continue as needed. The IDs are unique only to a specific table. |
Level | Select the level you want to associate with the tag on the Assets tab. See Creating Assets in the chapter Tags, Assets and Templates. |
Category | Select one or more categories for this attribute. See Categories Dictionary below. |
DateModified | Date the object was last changed. |
DateCreated | Date the object was created. |
Description | Enter a description of the object. |
Copying and Pasting Rows
You can copy and paste rows into and from tables in FactoryStudio. The smart copy/paste functions let you copy rows from one table to another within FactoryStudio. For example, you can copy tags and paste them into the Historian tab or the Items tab under Alarms. You can also copy and paste to and from a spreadsheet. In addition, you can import a comma-separated values (.csv) file into any table. Column headings must match the table you are importing into. The best way to ensure that the headings match is to copy rows into a spreadsheet first, then edit the spreadsheet.
Copying and Pasting Within FactoryStudio
To copy rows to another tab in FactoryStudio:
Copying and Pasting To or From a Spreadsheet
To copy rows to a spreadsheet:
To paste rows from a spreadsheet:
Importing Data
The system imports the data into the table.
This section explains FactoryStudio's major tools and features that are included to assist with common tasks.
Intellisense
The Intellisense feature presents a list of valid objects according to the characters you type into a specific input field and a list of the valid entries for that field. You can insert a selected item from that list by pressing enter, space, the dot key, or another symbol key. All the input fields that use tag names or object names, either in the datagrids or in the drawing tools, are enabled through Intellisense. The Intellisense fields have built-in tooltips and validation. Putting the mouse over a field will present the expected entries to that field. When you have an invalid input, the border of the field will become red and the tooltip will show the error.
Refactoring
Refactoring is the procedure of changing the definition of tag names or object names (such as alarm groups, device nodes, etc.) after the symbolic name is already in use in the application. Thanks to the centralized SQL configuration, FactoryStudio allows you to rename any object by simply typing the new name in the configuration table where that object is defined. All the references to that object will remain valid, using the new name with no actions required. For instance, to rename a tag that is already being used all across the project, just go to Edit-Tags-Objects and rename it. The same applies to Edit-Alarms-Groups, members of templates, or any named object in the system.
Cross Reference
You can view how many times each object is used in the project, and you can view a list of objects that are not used in the project.
There are three distinct ways to select the object for which you want a cross reference.
1. Do one of the following:
2. Click Find or, from the Select Object window, click OK. The search results will display in the Find window at the bottom of the page.
3. Double-click any row in the find results to go to that item.
4. To close the results pane, click Find window at the bottom of the page.
To track the number of times an object is used:
The table lists the number of references to every object in the system. To view objects that are not used, click the UnusedObjects tab. For a complete cross-reference of all objects, click the CrossReference tab.
In this Section: