Page Tree
Previous Releases
Inside the product installation folder, you will find an executable file called TMQTTBroker.exe. To run it, double click on the file. Once the file is running, a blue icon will appear in the Windows tray bar. will run by how it is configured in the TMQTTBroker.exe.config file. You can fine more information regarding this in the next section.
You can run the Broker as a Windows service by running the file InstallTMQTTBrokerAsService.exe, which is also found in the product installation folder. The MQTT Broker accepts connections with MQTT clients by following the SparkplugB specification. Also, it accepts connections with pure MQTT clients, that do not use SparkplugB, as the Mosquitto clients.
You can connect the TMQTTBroker with a runtime project, where it can make the all namespaces and properties from the specific projects available. When connected like this, the project information will be available following the SparkplugB specification.
Before running TMQTTBroker.exe, the file TMQTTBroker.exe.config must be configured with the desired configuration. TMQTTBroker.exe.config is in the product installation folder, and you can open it in any text editor. It is very important that the file name and extension (.exe.config) remain the same.
When you open the TMQTTBroker.exe.config file, you will find all the possible configured parameters. The parameters will be in comments between (<!−− −−>). To set a specific parameter, you need to move the whole line of the parameter outside the comments (<!−− −−>) but keep it in the section <configuration> <appSettings>.
Example of the whole line you need to move:
<add key="ListeningPort" value="1883"/>
When you run the MQTT Broker with the default configuration (without changing the .config file), it will assume the parameters below:
Below is the complete list of parameters found in the .config file and their respective description.
<appSettings>
<add key="ListeningPort" value="1883"/>
<add key="Backlog" value="100"/>
<add key="GroupId" value="TServer"/>
<add key="TimeUpdateTServers" value="500"/>
<add key="DisableRetainedFile" value="false"/>
<add key="CertificateFile" value=""/>
<add key="CertificatePassword" value=""/>
<add key="SslProtocols" value="Tls12"/>
<add key="UserNameAndPassword1" value="Test;#3B43F58BFF9AFF8CFF8BFFCDFF"/>
<add  key="ClientID1"  value="ClientID01;Topic1=*,Subscribe1=True,Publish1=True"/>
<add  key="ClientID2"  value="ClientID02;Topic1=*,Subscribe1=True,Publish1=True"/>
<add key="TServer1" value="<ProjectName>;localhost:3101"/>
<add  key="TagProperties"  value="Min;Max"/>
</appSettings>
The password can be a string (no encryption) or an encrypted password. To encrypt a password you can use in any coder (ex. Visual Studio), use the following code:
string Encrypted_password = T.Library.StringUtilities.ToHex(string <password>);
The encrypted password is a hex character that is in the .config file. To make sure the Broker knows it must decrypt the password to check for matches, you must add the ’# ’ symbol before the password.
<add key="UserNameAndPassword1" value="<UserName>;< Password>" />
E.g.: <add key="UserNameAndPassword1" value="test;1234" />
No encrypted password:
Encrypted password:
<add key="UserNameAndPassword1" value="<UserName>;#<Encrypted_Password>" />
E.g.: <add key="UserNameAndPassword1" value="test;#21B4F78BFF9AFF8CFF8BFF" />
DisableRetainedFile: The broker stores the last retained message and the corresponding QoS for that topic. The valid value is true or false. The default is false.
ClientID: This parameter can enable limitation for specific MQTT Clients related to For configuring more than one MQTT Client you need to create new whole line changing the last number to the next sequence number.
add key="ClientID1" value="<MQTTClientID>; Topic1=<Topic>, Subscribe1=<True or False>, Publish1=<True or False>" />
There are 4 internal parameters:
Publish: flag (true or false) that allows the client to publish a topic (can write messages)
<add  key="ClientID1"  value="MQTTClientTest;Topic1=*,Subscribe1=True,  Publish1=True"/>

<add  key="ClientID2"  value="32443fsa6546fa;Topic1=*,Subscribe1=True,  Publish1=False"/>

<add  key="ClientID3"  value="7323rt304343r4;Topic1=*,Subscribe1=False,Publish1=True"/>
The parameters below are used to make the TMQTTBroker connect with a running project (TServer).
add key="TServer1" value="<ProjectName>;<TServerIPAddress>:<TServerPort> " />

E.g.
<add key="TServer1" value="ProjectTest1;localhost:3101" />
<add key="TServer2" value="ProjectDemo;localhost:3201" />
<add key="TServer3" value="ProjectMQTT;192.168.1.10:3101" />
<add key="TagProperties" value="Minl;Max;AlarmState;Acked" />
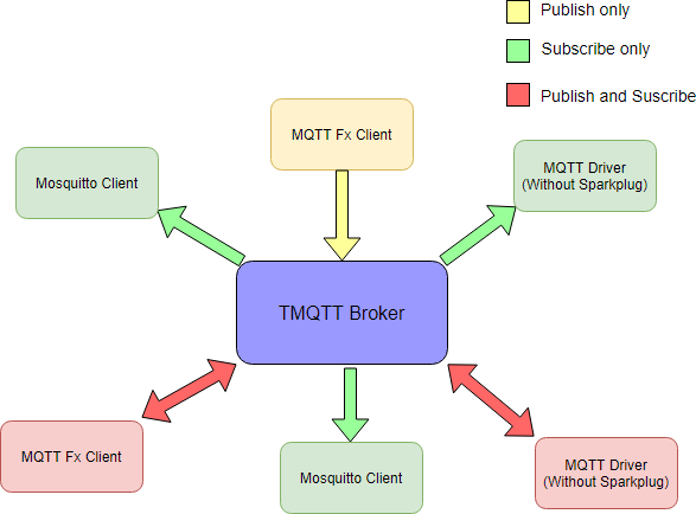
The TMQTTBroker can be implemented in two ways. It can be used as a simple gateway that exchanges data between any MQTT client or through a direct connection with runtime projects by publishing project data for MQTT clients using SparkplugB specification.
In this scenario, the TMQTTBroker only exchanges data between MQTT clients following the SparkplugB specification or not. Then, the clients are responsible to subscribe and publish topics to the Broker. All topic formats are shown in this scenario.
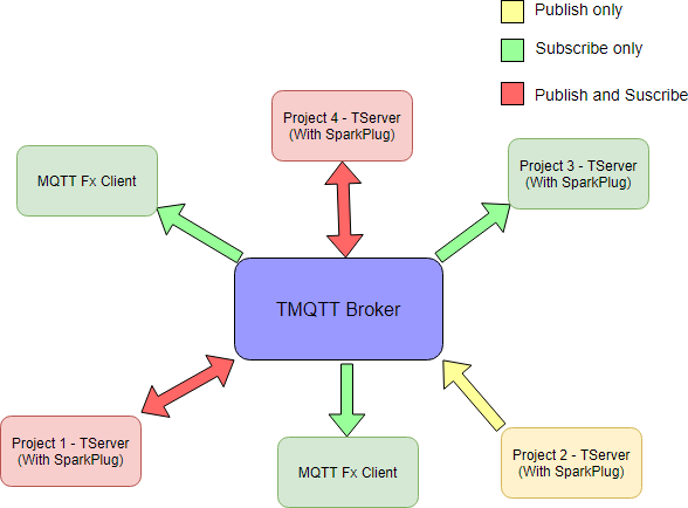
In this scenario, the TMQTTBroker connects with one, and then connects with several runtime projects through the TServer. It only publishes the project data for topics by following the SparkplugB specification.
The topic is configured following the syntax below:
spBv1.0/<Group_Id>/<message_type>/<Project_Name>/<MQTT_Device_Name>
Where the:
Examples of namespaces: Tag, Script, Device, Info, Script, Server, Security, Alarm, Historian DataSets, TemplatesName and MainTag for arrays.
Examples of objects: Tag.Test, Server.Second, etc.
Example of topic:
spBv1.0/TServer/DBIRTH/Project1/Tag
spBv1.0/TServer/DDATA/Project1/Tag
The topics are case sensitive.
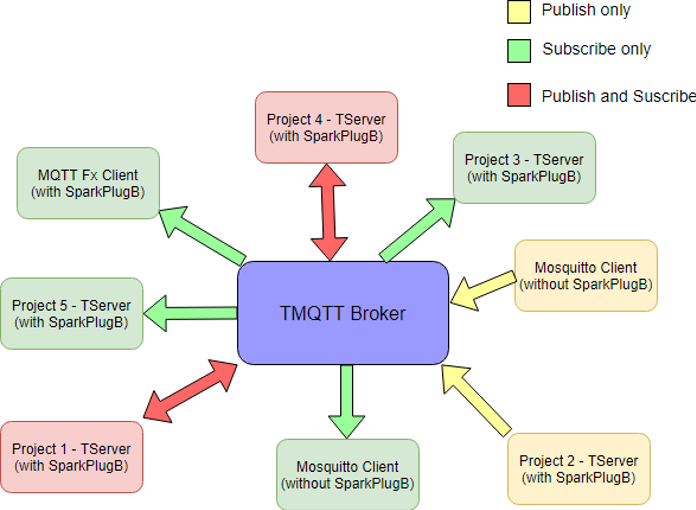
In this scenario, the TMQTTBroker works as the last two scenarios together. As a simple gateway exchange any data between the MQTT Clients and publishing data projects to the topics that match the project configuration in the TMQTTBroker.exe.config.
The first step to setting up communication between the TMQTTBroker and the MQTTdriver is to create a Channel using this protocol.
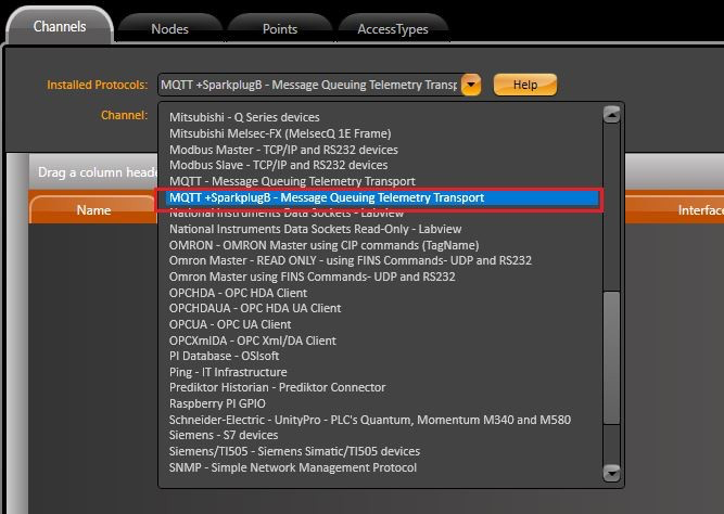
In the Engineering environment, go to Edit>Devices>Channels and find the desired protocol inside the list.

In the Nodes tab, the primary station is configured using the following syntax:
<BrokerURL> ; <port> ; [Username] ; [Password] ; [X509Certificate] ; [QoS]
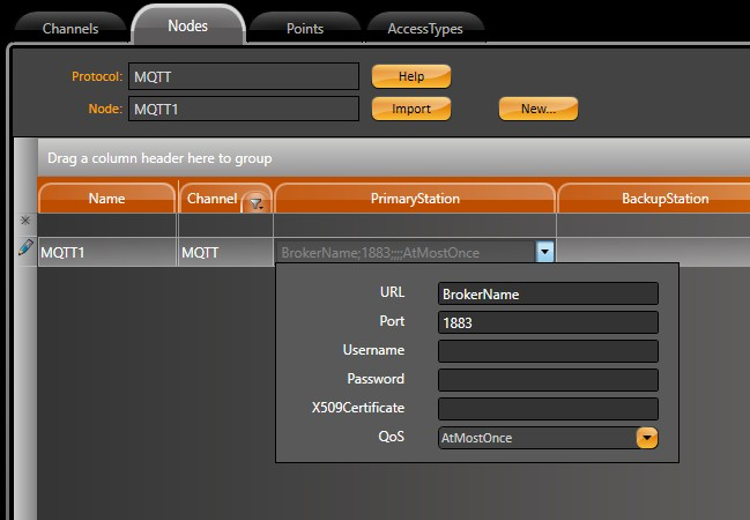
Where, Username, Password, X509Certificate, and QoS are optional.
In the Points tab, you need to configure the topic so that your variable can publish or subscribe to messages according to its AccessType. More information on each item is available in the MQTT driver documentation.

Clients can connect with TMQTT Brokers the same way they connect to other available Brokers (e.g: mosquitto).
In order to test the connection, you can use Mosquitto either as a publisher or as a subscriber. The syntax required to publish a message and subscribe to a topic with Mosquitto is:
mosquitto_pub -p <portNumber> -t <Topic> -m <Message>
mosquitto_sub -p <portNumber> -t <Topic>
An example of its implementation is:
mosquitto_sub -p 1883 -t Furnace/Temperature/Value
mosquitto_pub -p 1883 -t Furnace/Temperature/Value -m 22
To set up communication between MQTT + SparkPlug Driver and the TMQTT Broker, the first step is to create a Channel using this protocol.
In the Engineering environment, go to Edit>Devices>Channels and find the desired protocol inside the list.
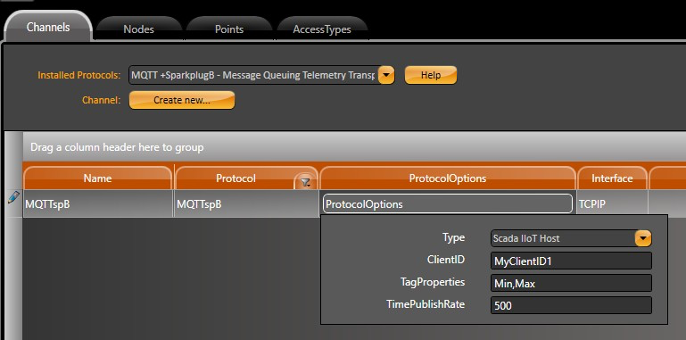
In the ProtocolOptions column, you need to fill out the following fields:
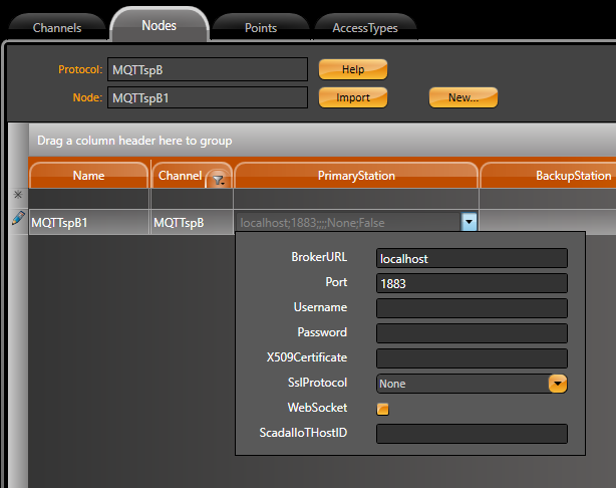
More information on each item is available in the MQTT + SparkPlugB driver documentation. In the Nodes tab, the primary station is configured using the following syntax:
<BrokerURL> ; <port> ; [Username] ; [Password] ; [X509Certificate] ; [SslProtocol] ; [WebSocket] ; [ScadaIIoTHostID]
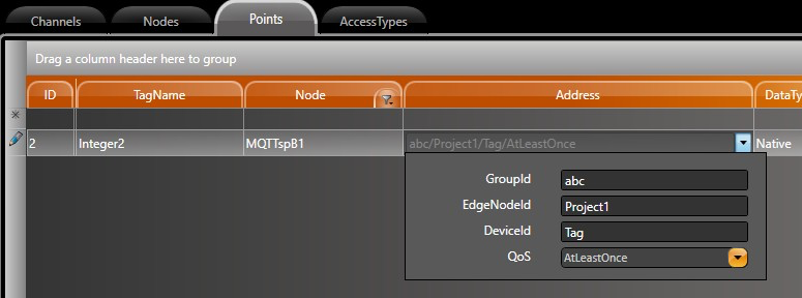
The topics are configured using the following syntax:
<GroupId>;<EdgeNodeId>;<DeviceId>;<QoS>
It is possible to set up a communication between TMQTT Broker with Third Parties MQTT Clients. In this example we will use MQTT.fx.
To configure this client the following steps are required:
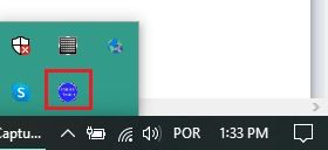
Step 1: TMQTT Broker must be running (look for icon in Windows TaskBar).
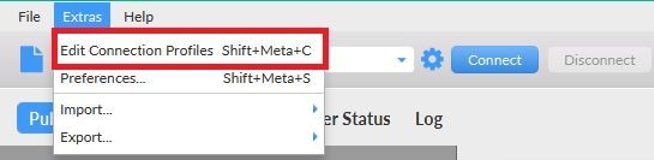
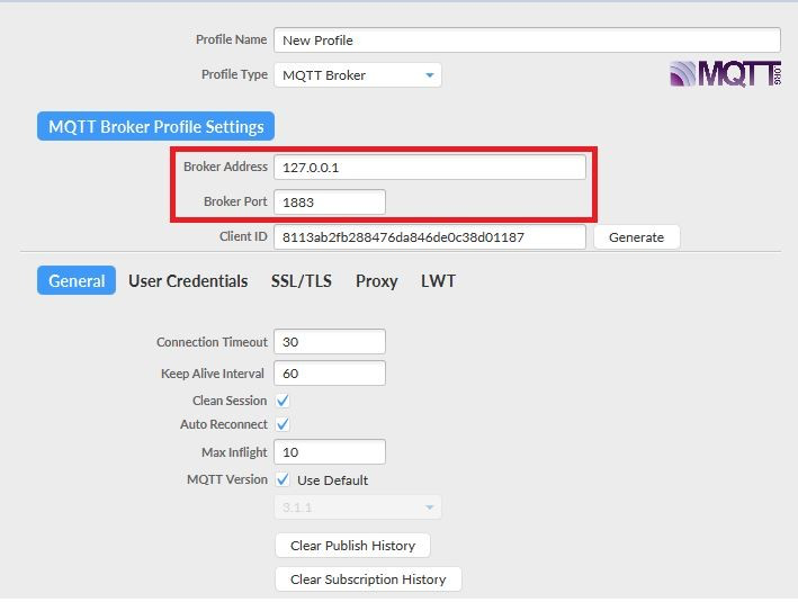
Step 2: In the Client, go to Extras > Edit Connections Profiles. In the opened Window you will fill the properties according to your Broker (e.g.: Broker Address and Broker Port). Then, click on connect.
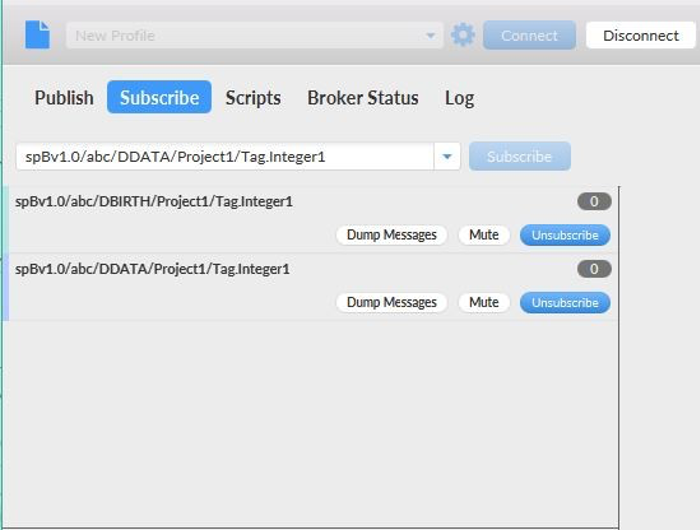
Step 3: In subscribe Tab the Topic will follow the syntax below:
spBv1.0/<Group_Id>/<message_type>/<Project_Name>/<MQTT_Device_Name>
Let’s imagine an example, in which the Project Name is ’Project1’ and we have an integer tag called ’Tag.Integer1’.
In this situation, to correctly subscribe to the Tag, first you need to create a Device Birth Certificate (to start the communication channel).
spBv1.0/TServer/DBIRTH/Project1/Tag.Integer1 // create channel for this specific tag
// or
spBv1.0/TServer/DBIRTH/Project1/Tag // create channel for all tags
After the device certificate is created, the subscription for data becomes available. The following topic is required to fetch data:
spBv1.0/TServer/DDATA/Project1/Tag.Integer1
// or
spBv1.0/TServer/DDATA/Project1/Tag
It is worth mentioning that for an array Tag it is not required to point each element individually. The broker is smart enough to fetch all data by just receiving the main Tag element. The same happens for Tags with Template Datatypes.
There are some other data that can exchange between the running project and TMQTT Broker. Some examples can be seen below.
spBv1.0/TServer/DDATA/Project1/Devices // Channel, Node and Points info spBv1.0/TServer/DDATA/Project1/Alarms // All properties spBv1.0/TServer/DDATA/Project1/Dataset // DB Status, etc spBv1.0/TServer/DDATA/Project1/Script // Tasks info spBv1.0/TServer/DDATA/Project1/Historian // All properties spBv1.0/TServer/DDATA/Project1/Server // All properties spBv1.0/TServer/DDATA/Project1/Info // TProject, License and Module info
spBv1.0/TServer/DDATA/Project1/Security // User, Permission and Policies info
The client is case-sensitive. If the Topic is not fetching data, check for possible typos in the subscribed topics.
Step 4: After subscribing for the desired topics, the exchanged data can be seen in the top-right
You must change the Payload Decoder to Sparkplug.
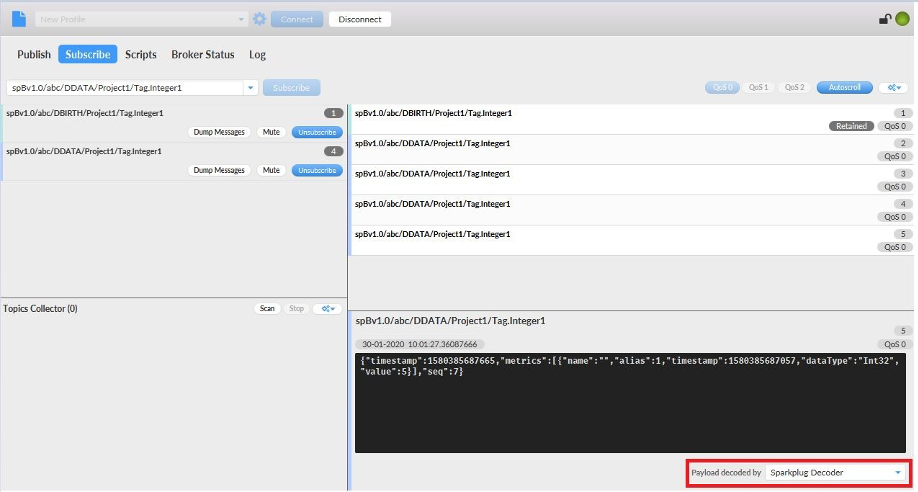
Step 5: To correctly format the received data, copy the message and paste it in any JSON formatter (e.g.: https://jsonformatter.org/json-pretty-print). The result should be something like the code below.
{
"timestamp": 1580152490182, "metrics": [
{
"name":  "Integer1", "timestamp": 1580152489659, "dataType": "Int32",
"value": 30
}
],
"seq": 1
}
As defined in http://mqtt.org/:
”MQTT is a machine-to-machine (M2M)/”Internet of Things” connectivity protocol. It was de- signed as an extremely lightweight publish/subscribe messaging transport. It is useful for connec- tions with remote locations where a small code footprint is required and/or network bandwidth is at a premium. For example, it has been used in sensors communicating to a broker via satellite link, over occasional dial-up connections with healthcare providers, and in a range of home automation and small device scenarios. It is also ideal for mobile applications because of its small size, low power usage, minimised data packets, and efficient distribution of information to one or many receivers (more...)”.
As defined in https://www.bevywise.com/blog/sparkplug-b-mqtt-simulation/.
Sparkplug provides an open and freely available specification for how Edge of Network (EoN) gate- ways or native MQTT enabled end devices and MQTT Applications communicate bi-directionally within an MQTT Infrastructure. One of the unique aspects of MQTT is that it was originally designed for real time SCADA systems to help reduce data latency over bandwidth limited and often unreliable network infrastructure. Similarly the intent of the Sparkplug specification is to take full advantage of MQTT’s native Continuous Session Awareness capability as it applies to real time SCADA/IIoT solutions.