Page Tree
Previous Releases
Selecting and Creating Displays
Displays are components of your application's user interface. A display can have multiple elements in it, including controls, data display areas, etc. The elements of a display can be static, that is, they always display items like a menu bar, toolbar, or status bar. Displays can change depending on what the user clicks or selects.
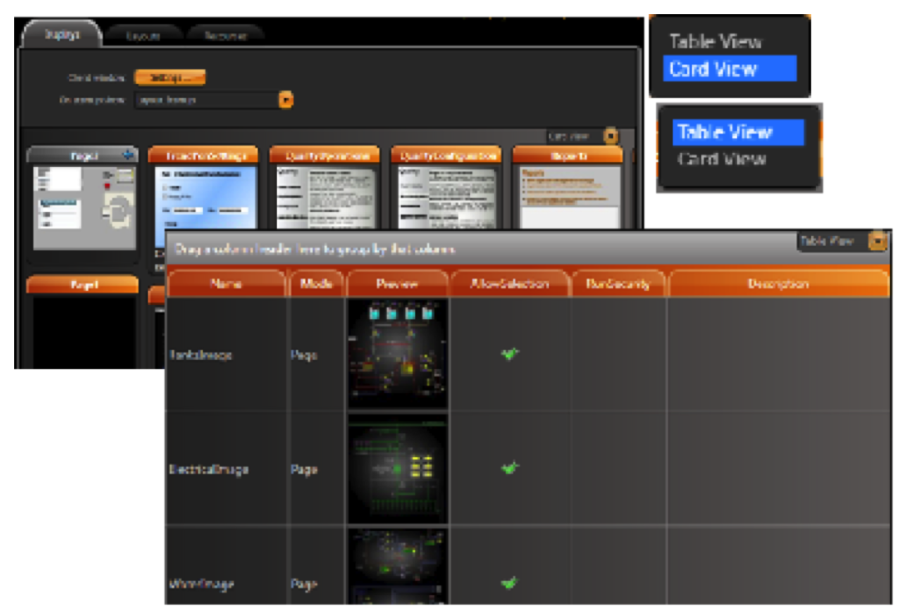
Below is the list of available displays.
Column | Description |
Name | Read-only. Name of the Display. Configured in Draw. |
ClientType | Read-only. Shows the type of the client, either NET or HTML5. |
Mode | Read-only. Shows whether the display is used as a Page, a Popup, or as a Dialog. Configured in Draw. |
Preview | Read-only. Shows a thumbnail of the display. |
AllowSelection | Select to allow users to select the display from the PageSelector. |
Width | Read-only. Display width in WPF units (one WPF unit = 1/96 inch). Configured in Draw |
Height | Read-only. Display height in WPF units. Configured in Draw |
Left | Read-only. Left margin, in WPF units, for Canvas layouts. Configured in Draw |
Top | Read-only. Top margin, in WPF units, for Canvas layouts. Configured in Draw |
Dimension | Read-only. Configured in Draw |
Size | Read-only. Configured in Draw |
EditSecurity | Select which categories of users have access to edit this display. |
RunSecurity | Select which categories of users have access to this display in runtime. |
Description | Enter a description for this display. |
[Other columns] | For definitions of other columns that are available in many tables, see Common Column Definitions. |
In order to edit a display, select the display and press the ![]() DRAW button.
DRAW button.
When you are in the Drawing environment, you can also switch displays using the dropdown list in the top toolbar.
Column | Description |
Display Name | Enter a name for the display. |
Description | Enter a description for the display. |
.NET Smart Client | Select this option if the display is designed to be presented natively on the host platform. |
HTML5 | When you create a display, select this option if you plan to use it as an HTML5 display in web browsers. You cannot change it later.
|
iPad/iPhone iOS Target | If you plan to use this display for iPad and iPhone users, select this option when you create the display. You cannot change it later.
|
Column | Description |
Mode | Select the type of display you want to create:
|
Background | Select the background color for the display. |
Width | Enter the width of the display, in WPF units (device-independent pixels; one WPF unit = 1/96 inch). Be sure to take into account the size of the layout. |
Height | Enter the width of the display, in WPF units (device-independent pixels; one WPF unit = 1/96 inch). Be sure to take into account the size of the layout. |
Border | Select the type of border. |
CloseButton | Select to display the Close button. Available only for Popups, Dialogs, and PopupWindows. |
Animation | Select the type of animation to use when starting this display. |
Show on PageSelector Object | Select to include this display in the page selector. The page selector lets users go directly to a different display in the application. |
iPad/iPhone iOS target | Read-only. Shows whether you selected the iPad/iPhone iOS Target option when you created the display. |
Placement | Select the placement of the display on the layout. Available only for Popups and Dialogs. |
Target | Select whether the display appears relative to the mouse position or relative to the whole window. Available only for Popups and Dialogs. |
DialogButtons | Select the buttons you want on the dialog. Available only for Dialogs. |
Title | Enter a title that appears at the top the display. |
Title Background | Select a color for the title background. |
Stays Open on Page Change | Leave the popup window open when the user clicks something that opens a different display. Available only for Popups. |
Stays Open After Losing Focus | Leave the popup window open when the user clicks a different display. Available only for Popups. |
Left | Enter how far from the left of the layout the display should appear, in WPF units. Available only for Canvas layouts. |
Top | Enter how far from the top of the layout the display should appear, in WPF units). Available only for Canvas layouts. |
When selecting multiple objects, the last object selected is the "master," whose properties are shown on the left. If you then align the objects, the alignment is based on the master. If you change other properties, the properties are changed for all selected objects.