Page Tree
Software Knowledgebases
In Factory Studio, users are able to run the projects on multiple ways, they are:
| In this section... |
|---|
|
| On this page: |
|---|
You can run the project in any of the following ways:
The best way to define an automated startup of the product, it is to use the configuration interface available on the Project Management tools, at the Server tab.
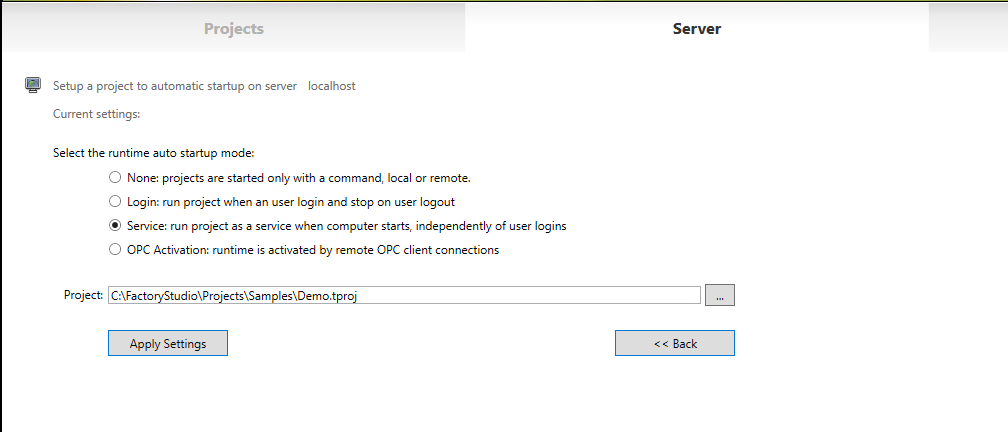
We recommend that you start manually during project development or installation, where an operator is needed during the startup process. When your project is setup for production, automated startup is more suitable.
You should use the login option, the startup shortcut, when testing the project, or in scenarios where the application will always run in the same Windows user profile.
Use the Windows Service on production servers when you need different Windows users to login to the computer, while keeping the server side runtime components running at all times.
We also support OPC client activation, in order to be in full OPC compliance, but we don't recommend its use, because, as a good practice principle, it is not desirable to allow the status of remote client connections to control whether a server side application is running.
The following sections will describe what those automated settings are doing in case, for some reason, you need to setup those startup settings without using the configuration tools.
Using a Shortcut on Windows Startup
You can configure a Windows server to automatically start a project using a startup shortcut. The startup shortcut starts the application when a user logs in to Windows, and the application stops running when the user logs off of Windows.
This procedure is automatically executed by the system when the startup mode is selected, as described above. This section will explain how to manually setup those shortcuts.
The Project runtime startup is executed by the program TStartup.exe.
When using this example, make sure to change the installation path and version of FactoryStudio to the installation on your computer.
The project is started from a command line window. The following command line parameters are available:
/project: Project Path and Name between double quotes
/username: (optional), username that will be used to start the server , if you do not specify, the user guest will be used.
/redundancy: indicates that the server redundancy is being used (requires ip1 and ip2)
/ip1: IP Address of the Primary FactoryStudio Server
/port1: TCP port of the Primary FactoryStudio Server
/ip2: IP Address of the Secondary FactoryStudio Server
/port2: TCP port of the Secondary FactoryStudio Server
/viewonly: indicates that the project is in view only mode
/wa: indicates that the project uses Windows Authentication
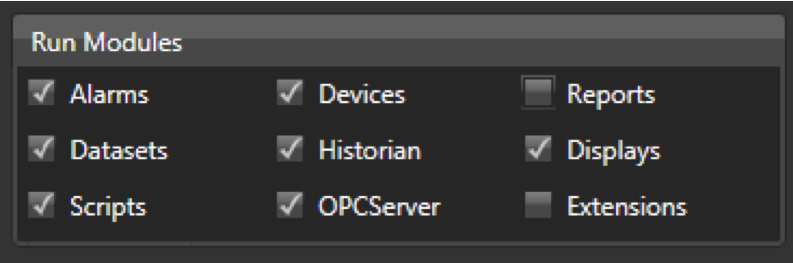
The modules that will be started are configured in the project, at Run > Startup.
Examples
"C:\Program Files\Studio\fs-8.1\TStartup.exe"
/project:"C:\Studio Projects\Project1.tproj"
"C:\Program Files\Studio\fs-8.1\TStartup.exe"
/project:"C:\Studio Projects\Project1.tproj" /port1:3101
Server Redundancy:
"C:\Program Files\Studio\fs-8.1\TStartup.exe" /project:"C:\Studio Projects\Project1.tproj" /username:Administrator /redundancy /ip1:192.168.1.1 /port1:3101 /ip2:192.168.1.2 /port2:3101
Creating the shortcut
Go to Start > All Programs, right-click the Startup folder, and select Open.
In the examples below, be sure to change the installation path and version of FactoryStudio to the installation on your computer.
When you restart the computer next, the project will start automatically.
Using a Windows Service to Startup
You can configure a Windows server to automatically start a project when the computer starts using a Windows Service. The Windows Service starts the application as soon as the computer is powered on and the Windows Operating System starts, even if no user has logged in to Windows.
This procedure is automatically executed by the system when selected for startup mode, as described above. This section will explain how to set it up manually.
These methods do not start the client (user interface with the displays). To automate the client startup, see "Automatically Starting Windows Clients", below.
Use the Windows Service only on production servers that you are not using as engineering stations, and only if you need the ability to differentiate Windows users logging in while the project is running.
The first several steps of the procedure below are required to let you set up the Windows Service.
To run your application as a Windows Service:
Field | Description |
Primary Server IP and Target Port | Enter the IP address and port of the primary server. |
Secondary Server IP and Target Port | Enter the IP address and port of the secondary server, if any. |
On Primary Startup | Select the option you want. |
Historian Replication | Select how to handle historian replication. |
Connection Timeout | Connection timeout time, in seconds, to switch to secondary server. |
Server Command Line | Read-only field populated based on the fields above. Click Copy to Clipboard to copy the command for use. |
Rich Client command | The commands to start a Rich Client with the project selected parameters |
Smart Client url | The URL to access the Smart Client with the project's parameters |
Web Client url | The URL to access the Web Client with the project's parameters |
View-Only | If checked, apply View-Only parameter to Rich and Smart Client's url |
Windows Authentication | If checked, apply Windows Authentication logon parameter to Rich and Smart Client's url |
The whole command line should look something like this:
"C:\ProgramFiles(x86)\Tatsoft\FactoryStudio\fs-8.1\ tStartup.exe" /project:C:\Factory Studio Projects\ <project_name>.tproj /username:<username>
installutil <InstallPath>\<fs-version>\TStartupAsService.exe
Example: C:\Windows\Microsoft.NET\Framework\v2.0.50727>installutil C:\Program files\Tatsoft\FactoryStudio\fs-8.1\ TStartupAsService.exe
"HKEY_LOCAL_MACHINE\SYSTEM\CurrentControlSet\services\ TStartup\ImagePath"
Example: "C:\\tatsoft\fs-8.1\TStartupAsService.exe" "/project:C:\FactoryStudio Projects\Project1.tproj"