Versions Compared

Key

  • This line was added.
  • This line was removed.
  • Formatting was changed.

The Drawing tab has the following controls to create, format, and configure displays:

  • Vertical toolbar—On the left side of the Drawing tab. Use these buttons to draw shapes, add buttons, and create special windows. For more information, see Table 1.
  • Horizontal toolbar—Across the bottom of the Drawing tab. Use these buttons to group, combine, align, and lock the selected objects. For more information, see Table 2.
  • Appearance, DisplaySettings, and other settings—Below the main menu buttons, these settings vary based on the type of object selected.

To configure dynamic graphic displays, click on the "Draw" icon in the main menu. 

The Appearance parameters dictate the brush style and color used when drawing objects in the display. Clicking on the Fill option lets you specify the colors, gradients, or objects with which to fill the graphic.

The DisplaySettings dictate the attributes of the display. Displays can be configured as Pop Ups, Dialogs, or as normal page displays.

Like with any graphical object, displays can have varying colors and patterns, borders, titles etc. 

One special feature is that you can specify that a transition animation is used when entering the display. 

In this section...

Page Tree
rootDisplays and Symbols


Vertical toolbar commands 


Commands

Description

Image Modified Selection Tool

  • Click on an object to select it.
  • CTRL+click
to select
  • selects multiple objects
(
  • and object groups
), one at a time
  • . Hold down the CTRL key as you click on each object.
  • Shift+click to
toggle selected
  • choose a main object from
among more than one
  • a group of selected objects
.
  • Click in an open area of the display
then
  • and highlight several elements to select a group of
elements by highlighting the elements while holding down the left mouse button.
  • elements 
  • Double-click on an object to open the "Dynamics
Configuration
  • configuration" window
, which
  • that provides settings for dynamic object properties.

Image Modified Direct Selection Tool

  • Use this tool to select an object inside a group

(
  • and modify its properties

)
  • . Click on the object once to select it.

  • You can also add, remove, and modify the points in a Polyline with the Direct Selection Tool

:
  • .

    • To move the point, click on the point to select it
by clicking the point and holding
    • and hold down the left mouse button
down
    • . Drag the point to its new position.
    • Double-click on a point to add a new point adjacent to the selected point.
    • Right-click on a point to delete the selected point.

Image Modified Hand Tool

Use the Hand Tool

The Hand tool can be used to modify the view window

by clicking

. Click once on the display background and

holding

hold down the left mouse button

then

. Then, shift the display to the desired position. 

Geometric objects tools

Right-click to end the use of each tool.
To add, modify, and/or remove points after creating a polygon or polyline, use the Direct Selection Tool.

Image Modified Rectangle

Creates a rectangle object.

Image Modified Ellipse

Creates an ellipse object.

Image Modified Polygon

Creates a polygon object.

Image Modified Polyline

Creates a polyline object.

Image Modified Button

Creates a button object.

Image Modified LabelBox

Creates a label box.

Image Modified Text Output

Creates a text output object.

Image Modified Text Box

Creates a text input/output (I/O) object.
To link the

text

I/O object with a tag, double-click the

text

I/O object

, under

. Under the Dynamic configuration window, select the TextIO dynamic.

Image Modified CheckBox

Creates a check box object. Right-click this button to access the following tools:
Image Modified Creates a radio button object.
Image Modified Creates a combo box.
Image Modified Creates a list box.
Image Modified Creates a password box.
Image Modified Creates a menu item.
Image Modified Creates a date picker.
Image Modified Creates a date/time text box.
Image Modified Creates a slider control.
After selecting a tool from this menu, it becomes the default tool for that button in the vertical toolbar.

Image Modified Open Symbol Library

The symbol library includes both built-in and user-defined symbols.

Image Modified Open Symbol Factory

The Symbol Factory is an external symbol library that contains a lot of symbols

precreated

created to be used

on

in the projects.

Image Modified Insert Image Resource

Insert an image to be used

on

in the

entire

project.

Image Modified Web Browser

Creates a Web Browser object. Hover over this button to access the following tools:
Image Modified Creates a Report Viewer object.
Image Modified Creates an XPS Viewer object.
Image Modified Creates a PDF Viewer object.
Image Modified Creates a Page Selector object.
Image Modified Creates an Assets component.
Image Modified Creates a Remote Assets component.
Image Modified Creates a Child Window object.
Image Modified Creates an external WPF component.

After you click the option "Creates an external WPF component", the following components will be available:

Image Modified Creates a Pie Chart object. For more information, see Configuring a Pie Chart.
Image Modified Creates a Map Control object.
Image Modified Creates a Report Preview object.
Image Modified Creates a Calculator object.
Image Modified Creates a Bar Chart object. For more information, see Configuring a Bar Chart.
Image Modified Creates an Advanced Pie Chart object.
Image Modified Creates a 3D Pipe Viewer object.
Image Modified Creates a Circular Panel object. For more information, see Configuring a Circular Panel.
Image Modified Import external dlls.

After selecting a tool from this menu, it becomes the default tool for that button in the vertical toolbar.

Image Modified Alarm Window

Creates an alarm window. Position the alarm window and double-click to configure the alarm window settings. For more information, see Configuring an Alarm Window below.

Image Modified Alarm Area

Creates an Alarm Area control

,

that

allows to

lets you view the existing alarm tree.

Image Modified Trend Window

Creates a trend window. Position the trend window and double-click to configure the trend window settings. For more information, see Configuring a Trend Window below.

Image Modified Drilling Chart

Creates a drilling chart trend window. Position the trend window and double-click to configure the trend window settings. For more information, see Configuring a Trend Window below.

Image Modified DataGrid Window

Creates a data grid window. Position the data grid window and double-click to configure the data grid window settings. For more information, see Configuring a DataGrid Window below.


Horizontal toolbar commands


Commands

Description

Image Modified

Grid definition

Image Modified

Screen Zoom

Image Modified

Group

Image Modified

Ungroup

Image Modified

Union

Image Modified

Intersect

Image Modified

Exclude

Image Modified

Exclusive-Or

Image Modified

AlignLeft

Image Modified

AlignHorizontalCenter

Image Modified

AlignRight

Image Modified

AlignTop

Image Modified

AlignVerticalCenter

Image Modified

AlignBottom

Image Modified

Move To The Front

Image Modified

Move To The Back

Image Modified

Change Z-

Oder

Order

Image Modified

Resize Width

Image Modified

Resize Height

Image Modified

SpaceEvenlyHorizontal

Image Modified

SpaceEvenlyVertical

Image Modified

FlipHorizontally

Image Modified

Flip Vertically

Image Modified

Lock element

Image Modified

Unlock element

Image Modified

Unlock All Elements

Image Modified

Show All Elements

Image Modified

Hide Selected Element
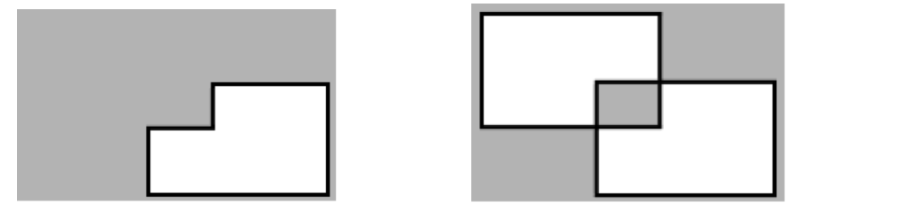
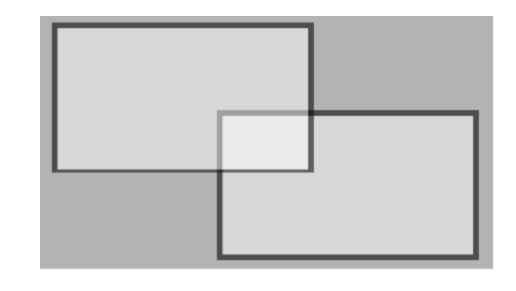
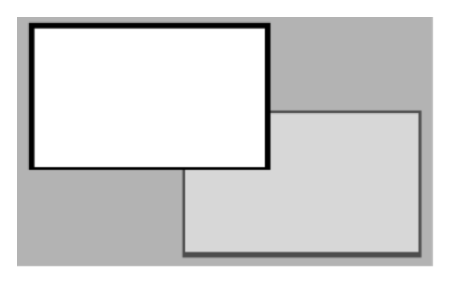
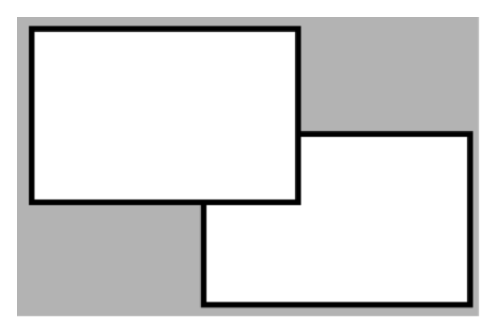

Examples

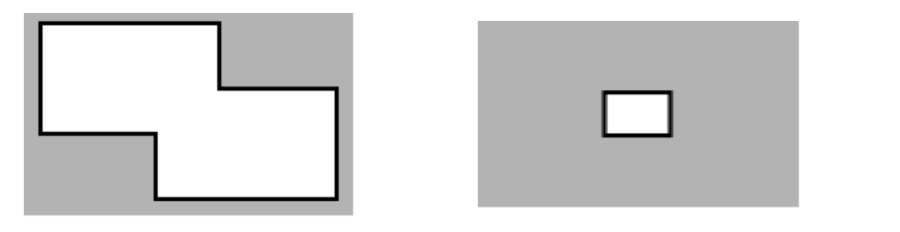
Here you will see examples showing the functionality of the commands of the horizontal toolbar.

The shapes used can be any object without Dynamicsdynamics, like polygons, ellipses, or rectangles.


Union  and Intersect  


Exclude  and Exclusive-Or  


  • Lock element command.  : Select both rectangles then click to lock. Now the rectangles can not be selected.
  • To unlock only one rectangle:
  • Click on the Direct Selection Tool command  on  in the vertical toolbar.
  • Select the on the desired rectangle and click on Unlock Element  . 
  • To Unlock all elements just , click on Unlock All Elements command  .