Overview
This page covers the setup and management of remote clients for the software platform. It details the supported client types: Windows (WPF) Rich Clients, Windows (WPF) Smart Clients, and HTML5 Clients. Instructions for installation, configuration, and automatic startup of these clients are provided. The guide also explains how to configure remote client users and manage client settings using parameters. Additionally, details on utilizing Windows Rich Clients for application deployment are included.
On this page:
Client Types
The platform can accept multiple clients.
- Windows (WPF) Rich Clients
- Windows (WPF) Smart Clients
- HTML5 Clients
We will describe what is required for the installation and configuration of each one of these clients.
Remote Client Users Setup
Windows Rich Clients
Rich clients are client applications that do a significant amount of processing on the client computer rather than on the server. You can deploy your application to be used by Windows rich clients.
Windows rich client deployment | |
|---|---|
Installation | Install the platform on the client computer. |
How to start | Run the TRichClient.exe program. For an example of how to automatically start the client when a user logs into Windows, see "Automatically Starting Windows Clients" in the previous section. |
Execution | The project runs in its own window. This client type has strong user security and includes the ability to disable the user from using the Windows Task Switch functionality. The ability to use or not use the Windows Task Switch can be tied to the user login. When running the TRichClientt.exe program on 64-bit machines, the application runs in 64-bit native code. If you need to run the 32-bit version, you can use the TRichClient32.exe program; this can be used to ensure compatibility with legacy COM and Active-X components. |
Communication | Communicates with the server using the Windows Communication Foundation (WCF) (port configurable, default 3101). |
Windows Smart Clients
Smart clients are client applications that behave like rich clients but either run from the web or can be installed painlessly with a single click. You can deploy your application to be used by Windows smart clients. The smart client runs like the rich client, but it uses ClickOnce™ installation. This technology allows you to have the same functionality as the rich client without having to install our platform on your computer.
The first time you access the application, the system automatically downloads the components necessary to run the application. The next time you access the application, the system verifies if the local cache is the same version of the application that is on the server, and if necessary, updates the local cache before running the application. If the version is the same, the application starts immediately.
Windows smart client deployment | |
|---|---|
Installation | No installation required. The client computer needs to have the .NET Framework 4.0 and Internet Explorer 8.0 or later. |
How to start | From Internet Explorer (or a shortcut) go to the URL: http://127.0.0.1:3101/smartclient |
Execution | Runs exactly the same as the rich client. The functionality of the rich client and the smart client are the same; only the installation and activation methods are different. |
Communication | Communicates with the server using WCF (port configurable, default 3101). |
Automatically Starting Windows Clients
Depending on the client type, you can create a shortcut to the appropriate executable to automatically start the application on a Windows client. You can create the shortcut on the desktop or place it in the Startup folder, as described below.
For web clients, you can configure the application as the home page for Internet Explorer.
Go to Start → All Programs, right-click the Startup folder, and select Open to open the Startup folder.
- In the Startup folder, right-click and select New → Shortcut.
- In the Create Shortcut window, paste the path into the input field.
- If you are not using redundancy, delete the redundancy part of the text.
- Do one of the following:
- For rich clients—At the beginning of the command line, enter or paste the full path to the platform's installation folder and put quotes around it. It should look something like this: "<installFolder>TRichClient.exe" /ip1:<IP_address>
- For smart or web clients—At the beginning of the command line, enter or paste the full path to the Browser installation folder and put quotes around it.
- Click Next.
- Enter a name for the shortcut.
- Click Finish.
The next time you restart the computer, the project will start automatically.
Auto-Start SmartClient or HTML5 clients
Helping to deliver maximum uptime for your users, the Auto-Start SmartClient (ASSC) is a self-healing watchdog application that helps ensure your remote SmartClient applications are always up and running.
The Auto-Start SmartClient can also act a WatchDog Application, restoring automatically all the connected clients then the server
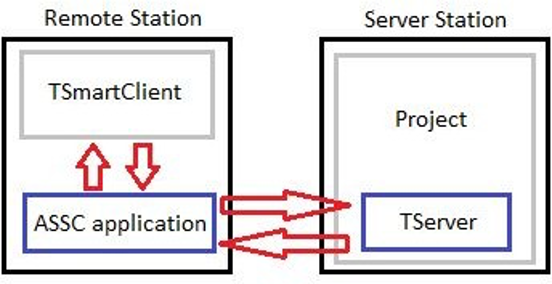
- The ASSC periodically checks to ensure the TSmartClient is running.
- If not, then the ASSC checks to see if it can reach the Project on the Project Server.
- And if it can, the ASSC will restart the TSmartClient automatically for you!

Configuration Overview
The Auto-Start SmartClient watchdog application is used to automatically start the TSmartClient in your project's remote stations. When installing the software, the file AutoStartSmartClient.exe will be added to the installation folder.
In the current version, the files AutoStartSmartClient.exe and AutoStartSmartClient.exe.config must be manually copied from the server station's installation folder to a folder on the remote station. After copying the ASSC application to the remote station, the user must configure the .config file; otherwise, the ASSC will start up with several parameters that will take priority over any parameters in the .config file.
The Remote Station must have already installed Microsoft .Net Framework 4.0 or 4.5.
When the ASSC application is running on the remote station, it will check every 30 seconds to see if the TSmartClient is running, or the user can set a time parameter for how often the application checks.
If the TSmartClient is not running, the ASSC application will refer to its configuration parameters to check for any communication with the server station. If the ASSC application is able to connect with the project through the TServer on the server station, it will restart the TSmartClient on the remote station using the URL parameter.
Parameters Configuration
Before running the application, you need to set the parameters in the AutoStartSmartClient.exe.config file. You can also pass the parameters by using a shortcut file.
The available parameters are:
- url : The SmartClient url that is found at Info → Redundancy
- hidden: A flag (true or false) used to set whether a popup is visible or runs in the background.
TRUE: window runs in background
FALSE: window is visible (default)
- browser : The browser that will be used to run SmartClient. Internet Explorer is the default browser.
- timer : The time (in seconds) between each attempt to retry the connection.
- ip: The computer IP for the computer running the runtime service, TServer.exe.
- port: The SmartClient listening port. By default, TServer.exe runs on port 3101.
- username: The RuntimeUser that is logged in. The default username is guest.
- password: A user created custom password.
- viewonly: A flag (true or false) to see if a project can be edited or is view only.
TRUE: Project is view only
FALSE: Project can be modified (default)
Configuration Example
To pass the parameters in the AutoStartSmartClient.exe file, you must create a shortcut to the file in a folder on the remote station. To do so, go to the installation folder and search for the executable.
Right-click on the file and select Create Shortcut. Then, place it in the desired folder. In order to finalize the configuration, right-click the newly created shortcut and select Properties.
Configure the file path as:
AutoStartSmartClient.exe /url:http://<IP Address>/<binary folder>/TSmartClient.application /timer:<seconds>

E.g.: AutoStartSmartClient.exe /url:http://192.168.15.31/xx-8.1/TSmartClient.application /timer:30
The url can be copied from the Engineering environment at Runtime → Smart Client url field. See the image below:

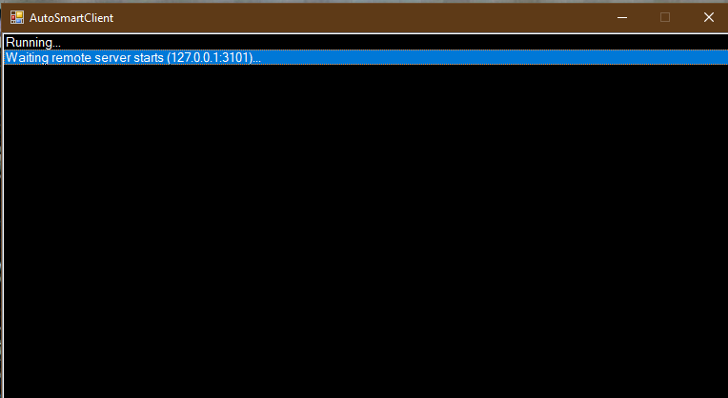
After setting the configurations, double-click the shortcut file and keep it running. You should see a window open with a message saying the application is waiting for the TServer to run. Once the project is executed, the TSmartClient will open automatically.
The TSmartClient needs a WebServer (ISS or TWebServer) running properly on the server computer.
In this section: