Page Tree
Previous Releases
FactoryStudio has built-in features to deploy redundant systems; both at the server level as well at the data acquisition level, allowing the deployment of fault-tolerant systems in an easy and reliable process.
Project synchronization is a concern when using redundancy, but FactoryStudio has tools to simplify it by bringing an effective collaborative engineering in place.
There are two basic types of server redundancy approaches, “Hot-Hot” and “Hot-Standby”.
In most cases, the “Hot-Standby” is the preferred way to implement fault-tolerant systems.
For a Hot-hot scenario, two servers and all of the servers' modules are running at all times. A custom application (typically, the TRemoteClient driver) does the synchronization of the Operator Inputs between the servers. When the application is feeding remote SQL databases or exchanging data with third party systems, a custom code on the application must ensure the data is not doubly written.
The Hot-Hot configuration is used when the process does not allow any switching time from the primary to the secondary. Therefore, there is no concept of “active server”. Both servers are fully active at all times. The remote client's Displays can access the project from either server. In order to create Hot-Hot scenarios with FactoryStudio, you need to have two servers running. You need to use the TRemoteClient to synchronize any necessary data between the servers, and use the Script to enable or disable pieces of the running application as required by the duplicated operation.
The disadvantage of the Hot-Hot implementations is that they require custom project engineering. Especially when you have integration with other applications and when the data-acquisition from the field devices is duplicated, which causes an extra load on the network of devices and potentially causes a difference of time-stamps among each station.
How to manage two operators in each station trying to give commands at same time as well as the integration of remote SQL and file system in order to avoid data duplication must be decided at the application level.
For these reasons, the Hot-Standby configuration is the preferred option when implementing fault-tolerant servers. The Hot-Hot scenario is mainly applied when the server activation time of the hot-standby, usually from 1 second to a few seconds, is not acceptable for the process. Otherwise, the Hot-Standby has as simpler configuration, no custom engineering, and it automatically guarantees data consistency among the servers.
In this scenario, there are two servers that have the project loaded, but only one server (the ACTIVE one) is running all the modules. The STANDBY server has the modules in a PAUSED state and is receiving the data synchronization from the ACTIVE computer to update its local memory but is not executing the tasks.
The redundancy is automatically implemented by FactoryStudio, using a simple configuration dialog. There is no need for custom programming, custom applications. Any project created as a standalone project can be deployed as a fault-tolerant pair with no engineering required, even when connected to third party systems.
The communication between the servers uses a WCF TCP/IP communication, which can be encrypted and uses any WCF feature. The data exchange uses a Tatsoft algorithm developed by years of field-experience, which synchronizes the data using a publisher-subscriber model that sends data only by exception (events and data-changes) in an efficient and reliable way.
Most importantly, the redundancy is not an external module. It is “redundancy-to-the-core”. FactoryStudio was designed from principals to have built-in, at the kernel level, support for fault-tolerant applications.
When the STANDBY server detects the ACTIVE computer is down, it changes the Modules from the Pause state to the Run state; starting with the real-time database's states and values according to how it had been received from the synchronization.
The detection of the Active Server is done typically by using a watch-dog message on the same TCP/IP channel that is being used to exchange the synchronization data, but the custom switch determinations can be added if needed. The “Connection Timeout” parameters in the redundancy configuration is the inactive time of the Active computer that makes the standby computer go live; the typical value for that number is from one second to ten seconds, depending on the network and servers.
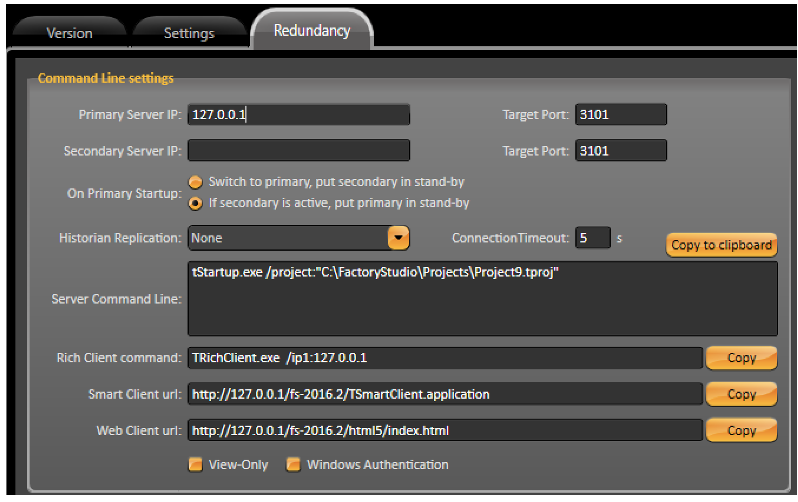
The Hot-Standby redundancy is configured in the Info-Project-Redundancy dialog.
The configuration is under the INFO tab (not the EDIT tab) because there are no changes to the project itself. Configuring redundancy is just about starting the exact same project with the optional redundancy parameters.
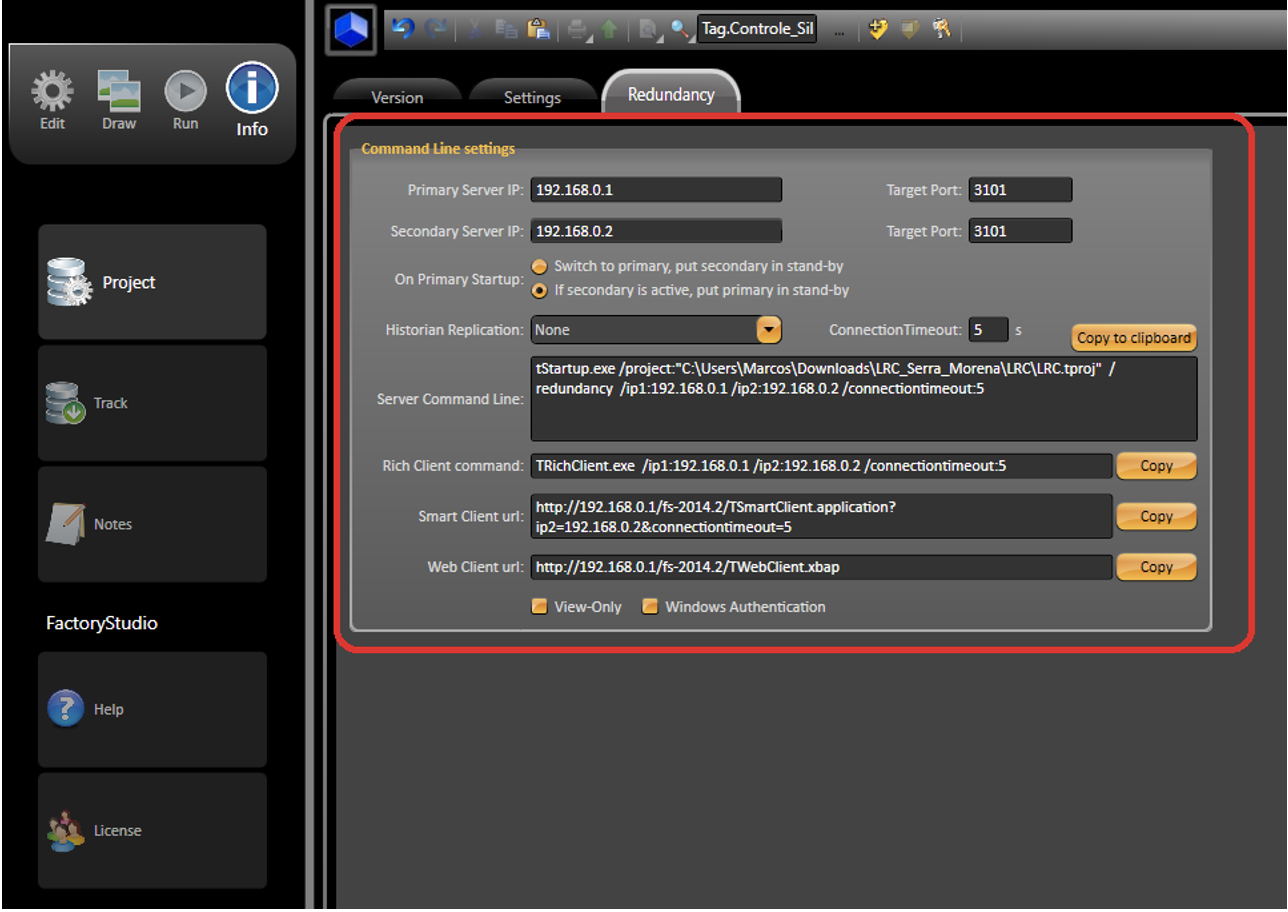
The key parameters to configure are:
ConnectionTimeout: Watch-dog time in seconds. This is the time the standby computer uses to monitor the activity of the active computer between doing the automatic switch. The Switch between active and standby can also be by command. In this case, the switch is immediate. Only the time to change the modules from Pause to Run on the standby computer is needed. The time ranges typically from one second to five seconds but is very dependent on specific project configuration, the server computers, and the network.
ConnectionRetry: Number of connection retries, default is one.
Primary and Secondary IP/Computer names: The computer IP address or DNS names of the computers that will work together as a fault-tolerant pair. They will run the exact same project configuration, and either one can be ACTIVE or STANDBY at any given time. The only differences between the one designed as the Primary and the one designed as the Secondary are:
Based on these settings, a custom command line for the TStartup.exe is created and presented on the configuration line. When you are deploying redundant configuration, you need to use the command line on Windows AutoStart or on the Windows Service configuration if you are running FactoryStudio as a Windows Service.
When running fault-tolerant applications, the Alarm Archiving server and the Historian archiving server can be located on the same computer as the FactoryStudio servers or on a third computer dedicated to the archiving, such as a Microsoft SQL Server or Oracle server. The “Historian Replication” configuration provides support to the many scenarios.
When the Historian is on a remote database machine, there is no need to do Replication on FactoryStudio. Since only one computer is ACTIVE, either the Primary or Secondary will write to the external database. In this case, you define “no replication” for the configuration.
Note that the external database can still be a fault-tolerant cluster that uses the Database redundancy tools, but the cluster is viewed by the FactoryStudio project as just one external connection.
If you are running either the Alarm database or the Tag historian database on the same computer as the FactoryStudio servers, you need to enable the respective Replication option.
When using redundancy, there is a set of parameters that can be assigned to both TStartup.exe and TServer.exe to specify its behavior. The command line is automatically created on Info-Project-Redundancy, but you can customize the command lines directly as needed. These are the parameters used:
The TimeAutoSwitch time is connected when you are using the /autoswitch option. In this scenario, when the computer designed as the Primary starts, it will ”auto switch” from standby to active after it starts. It is important that the switch happens only after the process had time to get all the synchronization from the active computer. Typically, 60 seconds should be enough for that, but you should increase that settings for large projects or slow networks.
FactoryStudio's centralized project configuration makes it easy to keep a project synchronized on both servers. All the project settings are only in one of two files, the tproj or trun file. You just need to make sure the file is the same on both computers when deploying your project.
Note that the switch depends on many factors: if there are pending operations, the project size, the computers, and the network. The total switch time is typically measured in seconds, but it is necessary to conduct a test on your specific scenario to specify the right parameters for the connection timeout and retry parameters.
You can setup your own procedure to synchronize the two files, or use FactoryStudio's automated methods for hot-standby configuration.
Option 1: Local IPC acting as the Primary Server
"C:\Program Files (x86)\Tatsoft\FactoryStudio\fs-2014.2\TManagerExe.exe" /project:"C:\FactoryStudio\Projects\ExampleProject1.tproj"
tools
"C:\Program Files (x86)\Tatsoft\FactoryStudio\fs-2016.2\PropertyWatch.exe" /ip1:computer name /username: Administrator
Option 2: For online changes, you should use the TPROJ file, instead of TRUN, and do the following steps:
The command line parameter /ProjectIPPath option allows you to define a verification path. When the application starts, it verifies the project configuration against the reference provided on the remote computer.
For off-line changes:
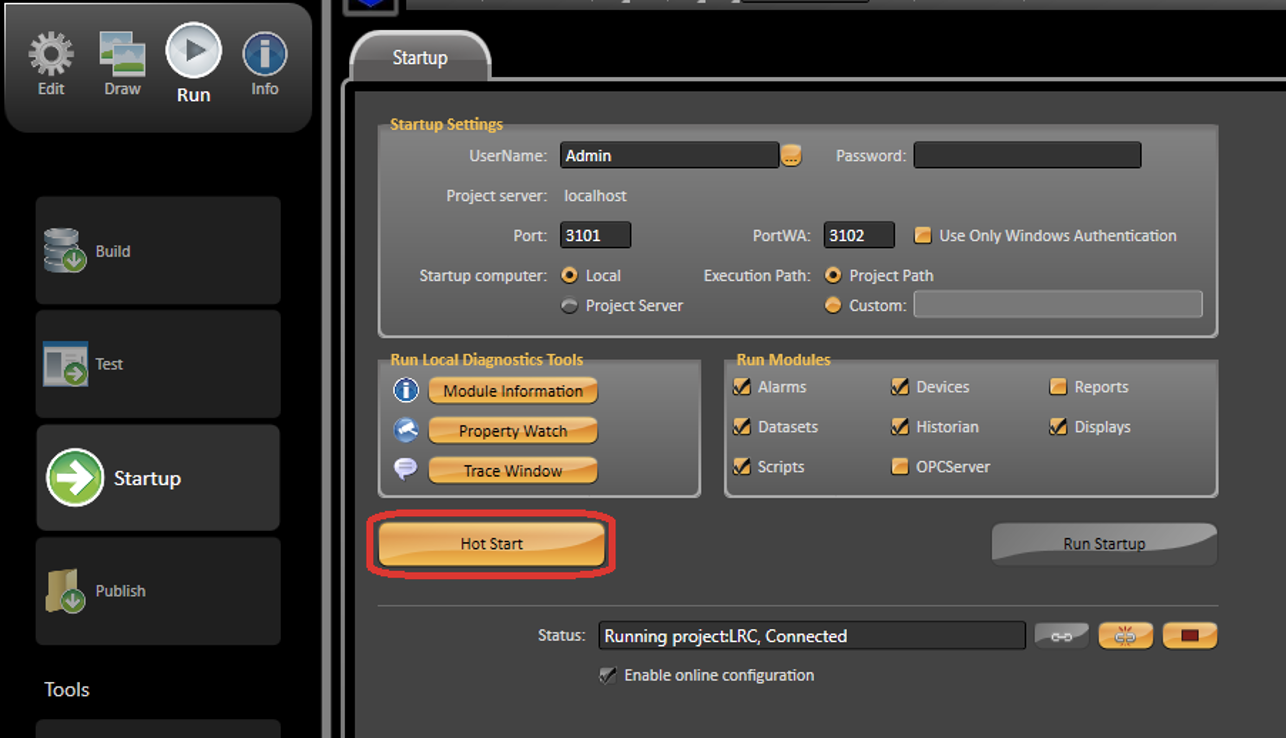
You can make changes to a project when it is running even if you are not connected to it. When you make changes to a project and apply all the new changes at once without stopping the application, it is called "hot-swapping". To do this: After you make your project changes, connect to the server, and press the HotStart button in the Run-Startup dialog.
It is possible to update projects without using engineering tools. There is a method @Server.LoadProjectVersion(<project>), which allows dynamic loading of new project configuration. This command can be included with the application itself or inside an external .NET application connected to the server.
FactoryStudio clients are easy to configure on any redundancy scenario. There is no programming or advanced configuration required. You just need to start the client station with the right parameter, as showed on Info-Project-Redundancy, examples: TRichClient.exe /ip1:192.168.1.1 /ip2:192.168.1.2 /connectiontimeout:5
http://192.168.1.1/fs-2014.1/TSmartClient.application?connectiontimeout=5;ip2=192.168.1.2
Clients do not even need to install any project files on their machines. Client computers will get all the project information from the server. The RichClient only needs FactoryStudio on the client computer. When using the SmartClient, the only thing needed is Internet Explorer installed on the client computer.
This is how it works: When the client starts (either the RichClient or SmartClient) it looks for the ip1 computer to connect. If it is not found, it switches to the ip2 computer. If the client loses connection with the server computer, it will try automatically to switch to the redundant pair without stopping the operator operations.
Clients can visualize critical redundancy information and even make a server switch using FactoryStudio runtime properties and methods.
There is a method included in FactoryStudio: @Server.SwitchToStandby()
That method will force the Active server to handle control of the Standby server; if the standby server is not running, the command fails, and the execution is kept on the same computer. If you want to use this feature, you need to create a protected display or button in an application screen.
The following are the most used properties:
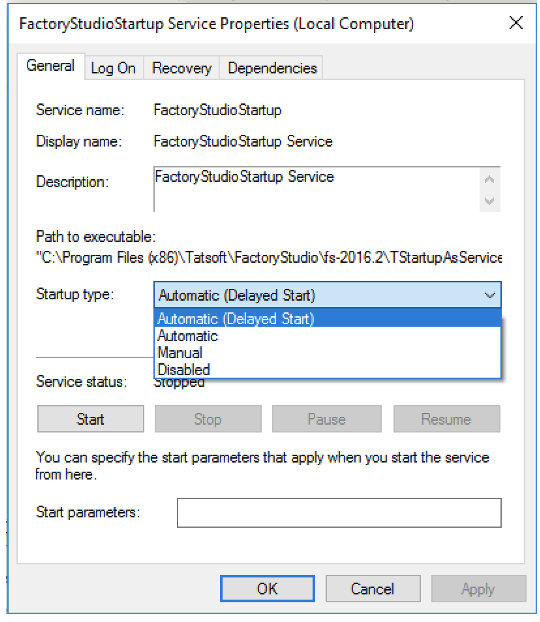
When running the application as a Windows Services, you need to take 4 actions:
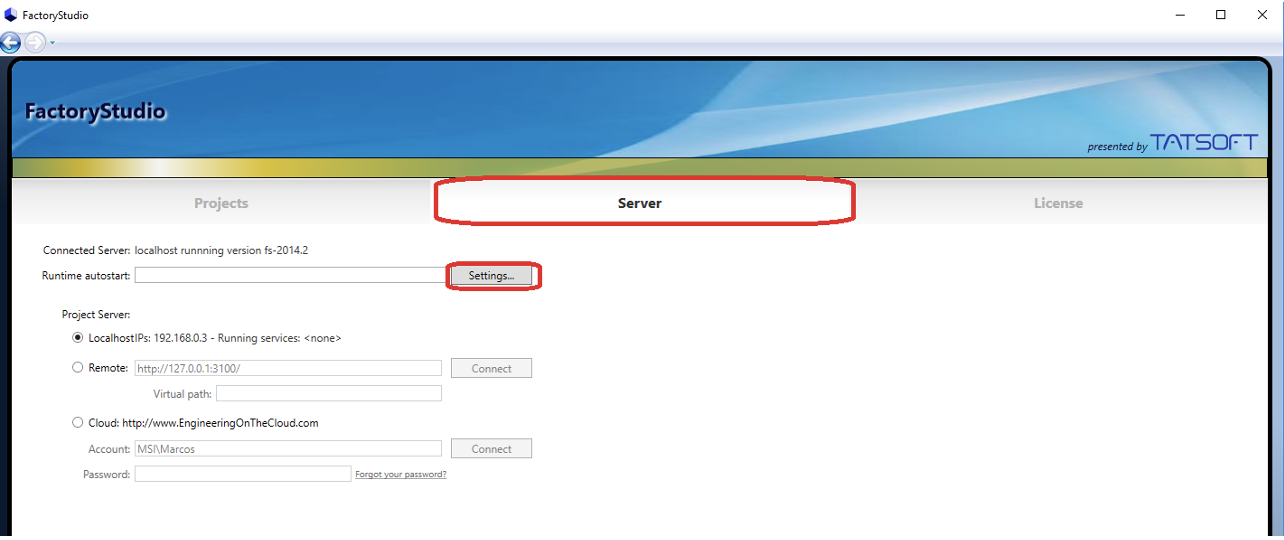
FactoryStudio can be set to start as a service which reduces downtime. This can be done on its Welcome window. On Server tab, click on the Settings… button.
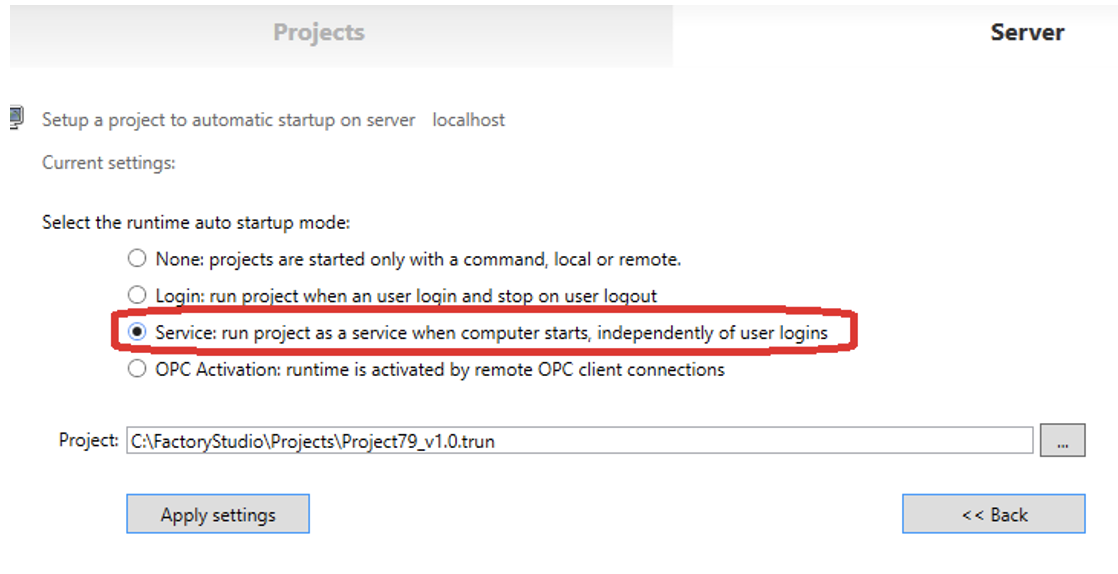
In “Select runtime auto startup mode”, choose the Service option to run the project as a service when the computer starts, and select which project you want. Finally, click the Apply Settings button.
If the project uses SmartClients for visualization, it is recommended to configure the TWebServer to run as a service as well.
You should uninstall the current TWebServer with the command prompt (e.g.: C:\Program Files (x86)\Tatsoft\FactoryStudio) and executing:
InstallTWebServer /uninstall /port:80
For running the TWebServer as a service, you can execute the InstallTWebServer using the parameter /windowsservice.
And for choosing a specific port, you can use the parameter /port:<portnumber>.
InstallTWebServer /windowsservice /port:1234
In order to setup Microsoft IIS, see the project documentation.
Verify the Windows Security settings for Log On
When you setup the project to run as a Windows Service, it will run by default under the built-in “Local System” Window Credentials. For some projects, especially if accessing external databases or folders, you may need to run under a specific user's Windows Security Log On credentials. The configuration is executed in the Windows Service Configuration directly. For most scenarios, the default configuration will suffice.
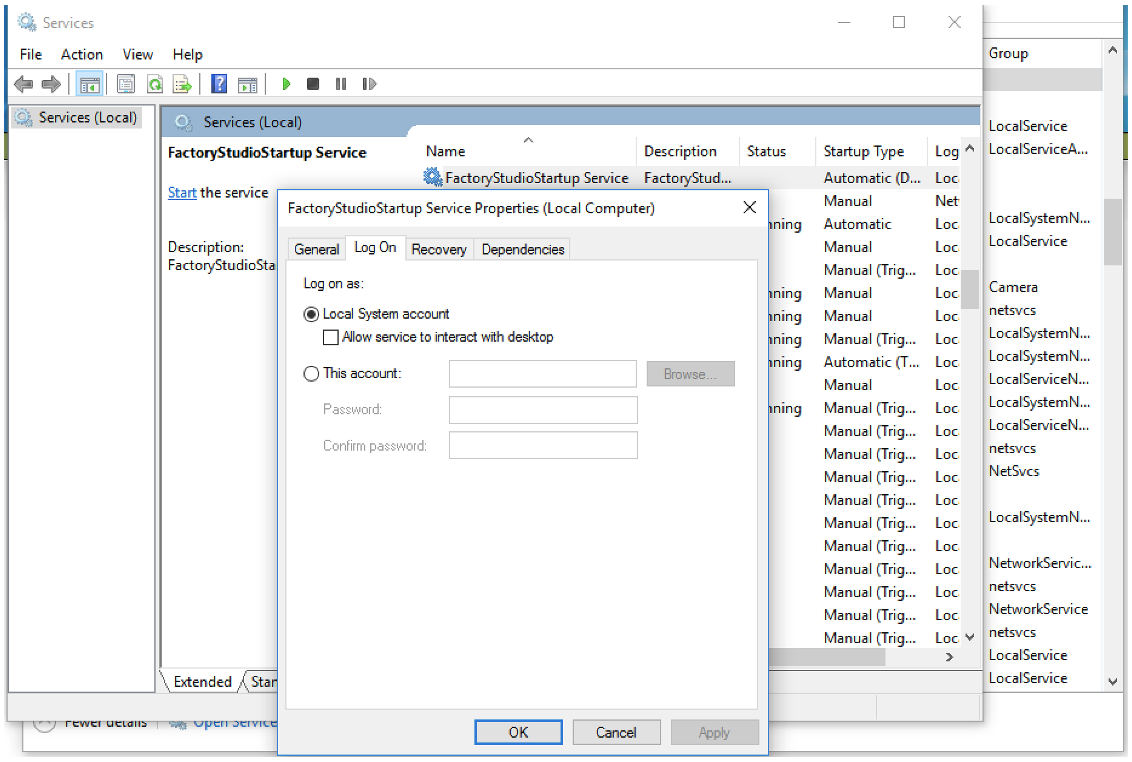
Optionally, you can delay the start of the service
If the application is using external resources, services, or applications, you may want to delay the start of the project to allow the other services to start first. This is also executed in the Windows Service configuration.
Setup the Security in FactoryStudio Project
When the application is running as a service, the server components will run under the credentials of the “project user” defined in Run-Startup. By default, the user is a “guest”. For most projects, that user will be changed to Administrator, which will allow the user to make changes to the project with online configuration or have access to all application objects.

The last step is to set up the start-up or the client displays. The procedure we will describe is the same if the client displays are running in the same computer or in a remote computer.
In order for the client to start automatically, you need to create a shortcut that the operator will click, or you can put the shortcut in the Windows Startup Folder.
The Shortcut will be for the RichClient or SmartClient. The RichClient start faster but need to have FactoryStudio installed on the client computer. The SmartClient do not need any FactoryStudio installation on the client computer, but it needs to have a web server running on the server computer.
The shortcuts can be created using the editing tool in Info-Project-Redundancy
The parameter /IP1 is the address of the server computer. The value 127.0.0.1, the local computer, it is the default value for that parameter. You may have to define other parameters, such as /port1, if you are not using port 3101, or Ip2 and Port2 if you’re on a standby scenario.
In order to access a project's displays in a remote server computer, the parameter /ip1 must have the server IP address or the remote computer name. Even though the parameter is called “Ip1”, it accepts the computer name in the network as long your network has a DNS service enabled.
In order to create the Windows shortcut, you can follow the steps on:
When you see the placeholder <IP_address> in command lines or URLs, it can always be replaced by the Computer Name in a network as long as the DNS services are enabled.
When you start the application in the user mode, you have the TStartup.exe application, which shows a dialog page with all the modules running, and you can start and stop the modules individually using that interface. The application is not visible when the project server (the TServer application) is started as a Windows Server.
If you want to access the same interface when running as a service, you need to start the PropertyWatch.exe located in the FactoryStudio installation folder (typically c:\Program Files (x86)\Tatsoft\FactoryStudio\fs-2014.2\PropertyWatch.exe).
When running as a service, you need to define the parameters /ip1 and /port1 with the computer name or with the computer IP. The default configuration will not allow a connection in this case. You can define the other optional parameters, such as /username. Ex.: "C:\Program Files (x86)\Tatsoft\FactoryStudio\fs-2016.2\PropertyWatch.exe" /ip1:W10-VS /username: Administrator
Another way to start these tools is to open the project configuration, Run Startup, and hit the connect button. This will enable a button on that dialog that will open the monitoring Tools.