Overview
The Asset Tree is a graphical tool on the software platform for organizing solution data within a customizable hierarchy. It enhances navigation, data management, and visualization of complex industrial systems. Users can create folders, add tags, and associate metadata (e.g., alarms, historians). During runtime, the AssetsTree Control displays the hierarchy, allowing interaction with elements and viewing of relevant data.
| Tip | ||
|---|---|---|
| ||
On this page:
| Table of Contents |
|---|
|
|
|
This page presents information about how to use assets and what they are used for.
| Info |
|---|
Introduction
Assets allow to Easily develop a Unified Namespace or any tag Hierarchy
- Easily add and combine metadata from multiple systems into a single cohesive Asset Model
- Organize your Tags in a folder structure with Logical Names
- Simplify visualization and navigation through templates
- Consume or Integrate external Models or Namespaces
Add Clarity and Context. Deliver all the info you need to anyone, anywhere, anytime.
Unified Namespace
The Unified Namespace is a software solution that acts as a centralized repository of data, information, and context where any application or device can consume or publish data that is needed for specific actions.
It allows users to collect data from various sources and transform it into a format that other systems can understand. Without a centralized data repository, it could take months to deploy a new analytics application across an entire enterprise versus the mere hours it would take with a unified namespace.
The Asset functionality in the platform is perfect to implant the concept of Unified namespace.
The ability to integrated dynamo Tag Provider, such as MQTT, OPC and Historian tools, in addition to the local project tags, makes the ideal coordination tool for distributed applications.
Configuration Overview
The Asset Tree configuration is located at Edit → Tags → Assets.
The Asset Tree has pre-defined folders:
- RootTags: All local tags created in the projects that were not placed in any folder (level) are automatically placed in this folder.
- TagProviders: When creating TagProvider connections, they are included in this folder, so you can easily browse the dynamic contents of the remote system.
The typical action when configuration the asset tree are:
|

Key Concepts and Terms
Asset Tree
A hierarchical representation of the solution’s real-time data variables, composed of tags and nodes.
Element
Any item in the Tree, whatever is a node or a final branch.
Asset Folder
Nodes in the tree that are containers for other objects or partial paths for TagNames.
RootTags Folder
Pre-defined node holding all tags not in any Asset Folder, helping manage large solutions.
Linked Folder
A folder dynamically linked to data from a TagProvider Connection.
Understanding the Asset Tree
The Asset Tree is the main centralized location for configuring your Unified Namespace, tags, and assets organization. In this interface, you can create AssetFolders, new tags, move elements within the tree, and create TagProvider Connections.
When the solution is running and the Designer is connected to the runtime, the Asset Tree also displays the current values for the tree elements.
Asset Tree User Interface
- Left Side: Shows the Asset Tree with a toolbar for localized actions.
- Right Side: Displays detailed information about the selected Node and its children

Asset Tree Toolbar

Button actions
- Reload the Tree: Refresh the Asset Tree structure.
- New Asset Folder: Create a folder in the Tree to store assets.
- New Tag: Create a tag in the Asset Tree.
- New TagProvider Connection: Establish a TagProvider connection for data retrieval.
- Insert data from TagProvider: Insert TagProvider data into the folder on the Asset Tree.
- Edit Element: Modify element properties in the Asset Tree.
- Rename Element: Change the name of an element in the Asset Tree.
- Create Data Template: Define a data template based on the selected element.
- Collapse All: Collapse all Folders in the Asset Tree.
- Asset Tree.
- Create a New Folder: Organize and group assets by clicking the new Asset Folder icon or right-clicking the Asset Tree.
- Copy/Paste Folders or Assets: Copy an entire folder or just one asset to another folder. All tags (including alarms, historian, and device configurations) will be copied as well.
- Rename Folders or Tags: Right-click any folder or tag to rename it directly from the Asset Tree.
- Delete Folders or Tags: Right-click any folder or tag to delete it directly from the Asset Tree.
- Move Tags to Selected Folders: Drag tags from the RootTags folder or other locations to the desired position in the tree.
- Refresh: Reload the Asset Tree content.
- Monitor Tag Values: Once the solution is running, monitor tag values directly from the Asset Tree through the Value column.
| Info |
|---|
If you don't see your data in the Asset Tree, make sure the click the Refresh button to reload the Tree. |

Configuring the Asset Tree
Configuration Workflow
The Asset Tree configuration is located at Unified Namespace / Asset Tree.
The Asset Tree has a pre-defined folder called "RootTags," which contains all local tags not placed in any other folders. For system integrity reasons, it is not possible to create new asset folders inside the RootTags folder; this is the only exception in the software.
The image below describes an example of a solution's hierarchy.

Adding New Asset Folders
- Click the "Add Asset Folder" icon on the toolbar of the Asset Tree
- Right-click on the RootTags folder on the Asset Tree.
- Right-click on a created Asset folder on the Asset Tree.
Adding New Tags
- Click the "New Tag" icon on the toolbar of the Asset Tree
- Right-click on the RootTags folder on the Asset Tree.
- Right-click on a created Asset folder on the Asset Tree.
- Use the "New Tag" button in the main toolbar.
If you don't specify a folder, the new tag will be placed in the 'RootTags' section of the tree.
Working with the Asset Tree
Showing the Asset Tree on displays
At Displays / Draw, under the Modules components, you can find the AssetTree Control. Simply drop this control onto your display, and the Asset Tree will be available in Runtime Displays for operators.
→ Go to AssetTree Control for more information.
Accessing Variables on the AssetTree
Tag Syntax
Access a tag directly using its full name, including folders.
Example: Tag.Area1/linha1/state
Asset Path Syntax
Use the Asset keyword to dynamically show the selected tag’s path.
Example: Asset("Area1/linha1/State1")
Useful for dynamic mapping or accessing values from TagProviders.
Example: Asset(client.Context.AssetPath + "State1")
In this example, the expression combines the selected folder with “State1” to display the corresponding State1 element from the Asset Tree.
Customizing the Alias for a selected node
After creating a TagProvider Connection, it will create and map a folder on the Assets Tree. To customize the Alias, right-click on the selected node and select the Edit Asset Folder option to open the configuration dialog.

In this section:
The image below describes an example of a project's hierarchy.

Asset Engineering Configuration
In the Engineering Environment, you should find the Assets tab on Edit → Tags. If this tab is not available in your project, please check to see if you have the Enterprise project family. (The project will need to be reopened for changes to be applied.)
This tab contains a treeview structure that, by default, automatically displays all your project’s Tags. They are added to the Root Element called Element. This allows you to navigate to the child elements and drill to Arrays or Templates.

| Note |
|---|
Once you have the project running, you will be able to monitor the Tag values directly from the Engineering Environment through the Value column. |
This AssetTree is not limited to the defined structure of the Tags . You can create your own architecture. To do so, right-click a Level — In this example, it is the Root Element —, and select the New Level option.

After you give the level an appropriate name, you can start adding Tags to it. You can move (click and drag) an existing Tag from the Root or create a new one directly from the New Tag button.

| Note |
|---|
You can create new Tags from the Assets tab. You can also add Alarms as well as add it to the Historian and to communication Points directly from this dialog. |
You can add Dynamic Data from the TagProvider inside your treeview structure. For more information, please refer to the Tag Provider documentation.
We improved this component in this version of the platform by adding the ability to have the same Tag in more than one level.

In this configuration, the Tags are not exactly the same. Instead, they are objects from the same Tag Instance. This can be seen on Edit → Tags → Objects where two instances of the IntegerTag are on a table but are mapped to their own Level.

You can copy/paste an entire Level or just one Asset from a source Level to a destination one. By doing so, all Tags (and their Alarms, Historian, and Device configurations) will be copied as well.
With this information, your system model can be built in an Asset format, which can be displayed in Runtime with the Assets Control.
Show Asset Tree on displays
Asset Control
This component allows you to view the same structure in Runtime that is defined in the Engineering Environment. To do so, go to your Draw Environment, and select the AssetControl component from the toolbar.

Add the component to your display, and customize it according to the settings described below.

The parameters are described as follows:
- ControlName: Element's reference name so its properties can be accessed and manipulated in CodeBehind.
- SelectedAsset: Tag that receives the selected Asset in Runtime.
- SelectedLevel: Tag that receives the selected Level in Runtime.
- Show Only Tags: Flag that indicates if the Asset Tree will be composed of only Tags (if true) or other project objects (such as Displays).
- Show Tags On Root: By default, all common type Tags (Integer, Digital, Text, etc) are added to the Root. By unchecking this option you can filter these elements out.
- Expand Tags: Flag that indicates if multi-level Tags can be expanded (Templates, Arrays). If unchecked, only the main Tag will be in the Asset Tree.
- Show Client Tags: Flag to define if client domain Tags will be displayed in Runtime. If unchecked, only server gomain Tags will show up.
- Prefer Display Text: Flag to indicate if the text that will show up in the Tree is the TagName or its Alias (defined in Edit > Assets > DisplayText). If checked and the column is empty, the TagName will be used.
- Localizable: If checked, Tag Names (or aliases) can be translated to different languages according to your project dictionary's settings.
CodeBehind and IO Components
You can also access the Asset elements from the CodeBehind by navigating through the TagNamespace. IntelliSense will display the Tags and their respective Levels.
Similar to the TagProvider approach, the elements from the Asset View can be accessed with the syntax: ASSET(”? CompleteAssetName ?”) either in a TextBox element or the CodeBehind.

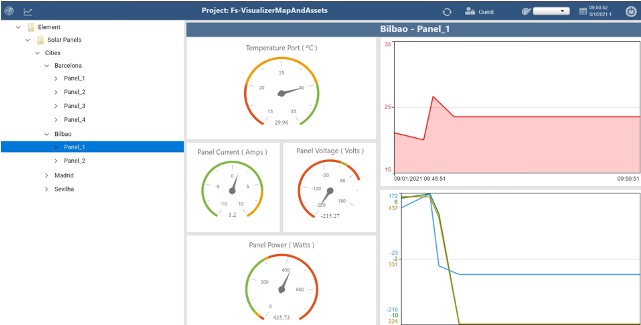
Runtime Behavior
In runtime, your Asset Tree and its components will look like the image below.

The SelectedAsset and SelectedLevel Tags will also change according to the element you click on.
In this section...| Page Tree | ||||
|---|---|---|---|---|
|